25 Utility Closet Organization Ideas for 2026
How Do You Organize a Small Utility Closet Without Wasting Space?
I find that the easiest way to organize a small utility closet is to give every item a specific place. Instead of buying more storage containers right away, I start by removing everything, sorting supplies, and checking which areas are going unused. Shelves, wall hooks, door organizers, and clear bins can make a small closet much easier to use without a major renovation.
The best setup depends on what I need to store, how often I use it, and how much room I have for tall items such as vacuums, brooms, and mops. I keep everyday essentials within easy reach, place backup supplies higher up, and reserve the floor for larger equipment. These simple utility closet organization ideas help me use vertical space, reduce clutter, and keep household supplies easy to find.
Key Takeaways
- Start with a clean slate: Empty the closet, remove expired products, and group similar items before organizing.
- Use vertical space: Install shelves, wall rails, and hooks to keep tools off the floor.
- Make the door useful: Add slim racks or pocket organizers for small, frequently used supplies.
- Group items by purpose: Use clear bins and labels to keep cleaning products, tools, and household essentials separate.
- Keep safety in mind: Store heavy items low, secure shelves properly, and keep cleaning chemicals away from children and pets.
- Maintain the system: Spend a few minutes each month putting items back and checking what needs replacing.
Zoned Shelving
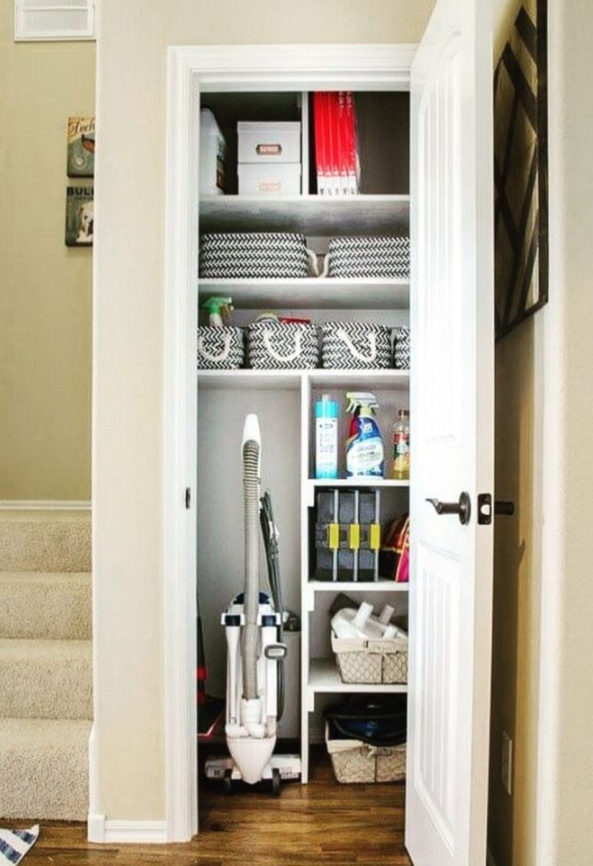
I get better results from shelves when I assign each level a specific purpose. The upper shelves are useful for lightweight items I rarely need, such as spare paper towels, extra cloths, and unopened cleaning supplies. I keep the products I use most often on the middle shelves so I can reach them without moving other things.
Clear bins help me keep sponges, brushes, gloves, and cleaning cloths together instead of spreading them across the shelves. I also leave a separate section for tall bottles and narrow containers so they do not take over the space meant for other supplies.
This arrangement works particularly well in a tall utility closet. I measure the available height and depth before installing shelves, then leave enough clearance for the vacuum, mop, or other bulky equipment. My main rule is simple: every shelf should have a clear purpose, and nothing should block the items I use regularly.
Tall Sections

I prefer to give long cleaning tools their own vertical storage area rather than leaning them against shelves. A narrow section can hold a broom, mop, vacuum, dustpan, or other equipment with long handles without taking up valuable shelf space.
Wall hooks and sturdy tool holders help keep these items upright and prevent them from falling whenever I open the closet door. If I have reusable shopping bags, cleaning aprons, or lightweight utility items, I can hang them nearby as long as they do not interfere with the tools.
I use the remaining shelves for smaller supplies, including wipes, cloths, paper towels, and cleaning bottles. This layout is especially helpful in narrow closets because it separates tall equipment from everyday products while keeping the floor available for a bucket or compact storage bin.
Door Storage
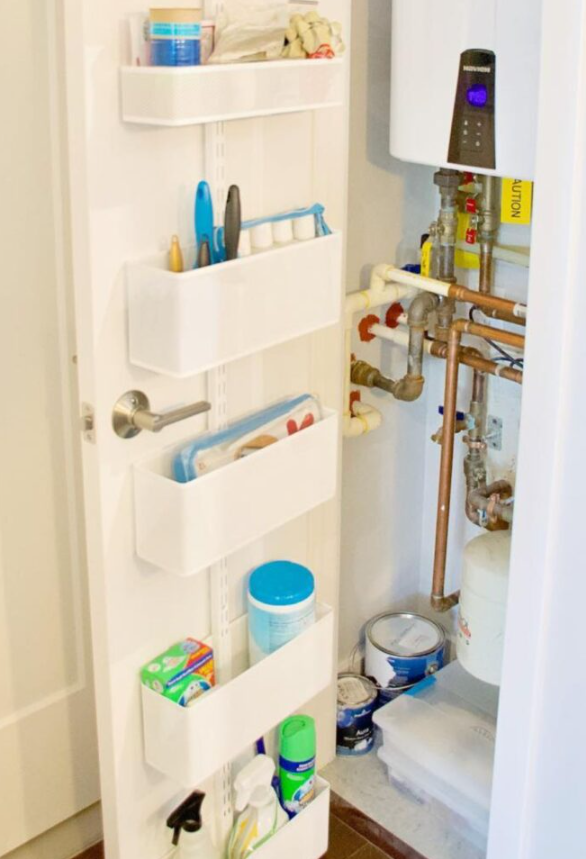
I treat the inside of the utility closet door as extra storage space, provided the door can support the organizer and still close properly. A slim hanging rack can hold gloves, small bottles, wipes, dusting supplies, and other lightweight items that often get lost on crowded shelves.
I place frequently used supplies at a comfortable height so I can grab them without searching through containers. For smaller items, individual pockets or shallow baskets are often more practical than one large compartment where everything can become mixed together.
Before installing a door organizer, I check the door’s clearance, hinges, and weight limits. I also make sure the rack will not hit shelves or stored equipment when the door closes. This simple addition can free up shelf space without requiring a larger closet or a complicated installation.
Clear Containers
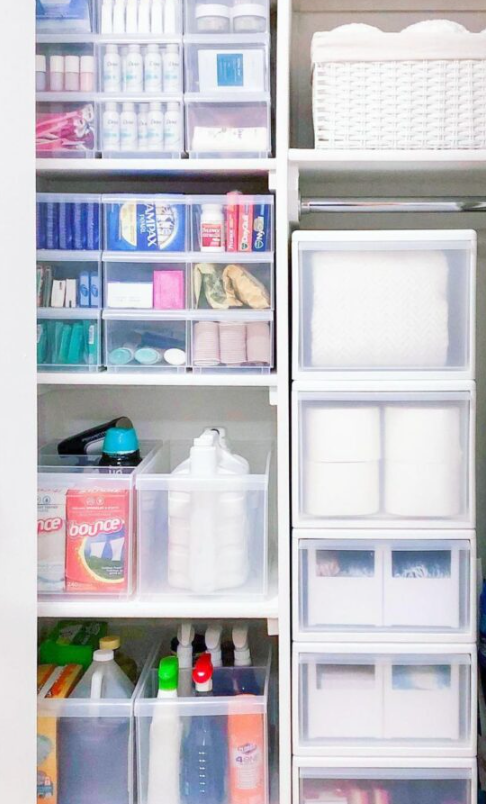
Clear storage containers make it easier for me to see what I already own. Rather than opening several boxes to find a refill pack or a cleaning brush, I can quickly identify the right container and take out what I need.
I group similar supplies together, using separate bins for cleaning cloths, sponges, laundry products, spare bags, and replacement supplies. Taller containers work well for upright bottles, while shallow bins are better for small accessories that might otherwise disappear at the back of a shelf.
I also check the dimensions before buying containers because bins that are too deep or wide can waste space and make items difficult to reach. When possible, I choose stackable containers that fit the shelf measurements. This keeps the arrangement tidy while making it easier to restock supplies and avoid buying duplicates.
Wire Shelves
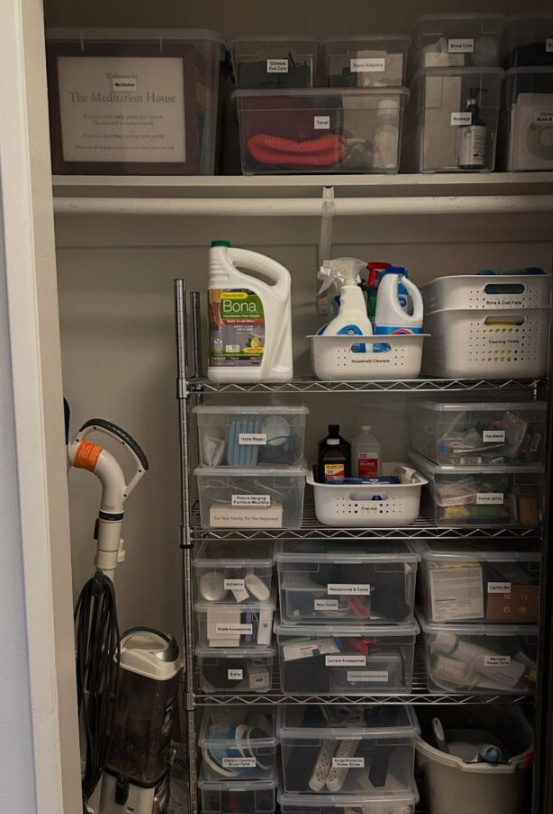
When a utility closet has limited built-in storage, I consider a freestanding wire shelving unit. It can add several storage levels without the need to install a full cabinet, making it a practical option for many rental homes and laundry areas.
I use the shelves for categorized bins, spare paper products, and lightweight household supplies. Keeping everyday essentials near eye level makes them easier to reach, while less frequently used items can go higher or farther back. I leave an open section for larger equipment instead of filling every available inch.
Before choosing a rack, I measure the closet carefully and check the unit’s dimensions, weight capacity, and stability. I also make sure the shelves will not block access to plumbing, electrical equipment, or ventilation. Open wire shelving allows airflow, but I still store cleaning products according to their labels and keep containers secure and upright.
Tool Hooks
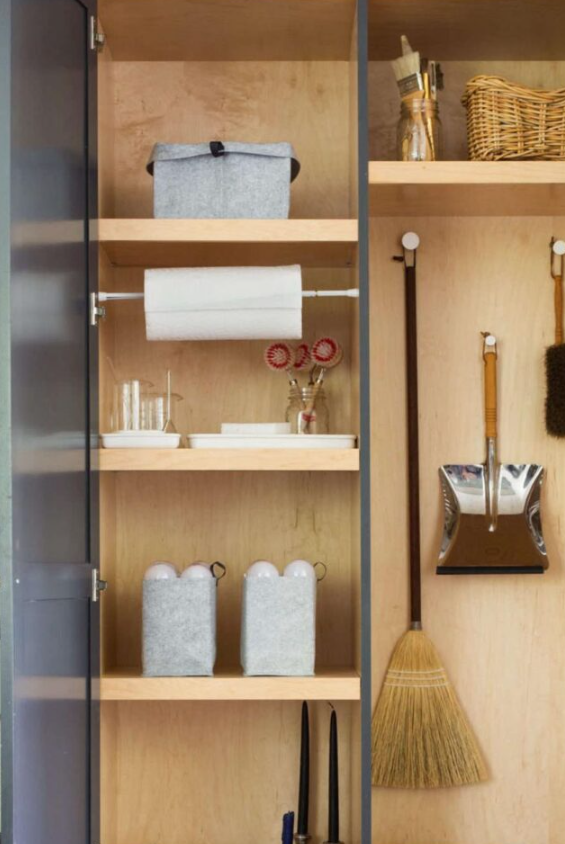
Brooms, mops, dustpans, and brushes can take up more floor space than expected when they are left leaning against a wall. I use sturdy hooks or a wall-mounted tool holder to keep these items together and stop them from slipping whenever someone opens the closet.
Once the long handles are off the floor, I have more room for a bucket, vacuum attachments, or a small bin. I keep shelves on the opposite side for cleaning products and smaller household supplies, which creates a clear division between tools and consumables.
I choose hooks that match the weight and shape of each item and install them into a suitable wall surface. If I store a roll of paper towels in the closet, a small holder beneath a shelf can make it easier to grab a sheet without taking up additional shelf space.
Wall Rails

I find wall rails useful when I have several long-handled tools but limited room for a large organizer. A rail with adjustable grips can hold brooms, mops, dusters, and similar equipment in one row, making each item easy to remove and return.
This setup keeps tools from leaning into one another and leaves the bottom of the closet more open. I can use that freed-up area for a vacuum, cleaning bucket, or storage bin without having to move everything whenever I need one tool.
For a more complete system, I combine the rail with shelves or small baskets for gloves, cloths, and replacement supplies. Before mounting anything, I check the wall material, the rail’s load rating, and the manufacturer’s installation instructions. A securely installed rail is much more useful than one that shifts under the weight of the tools.
Pocket Organizer
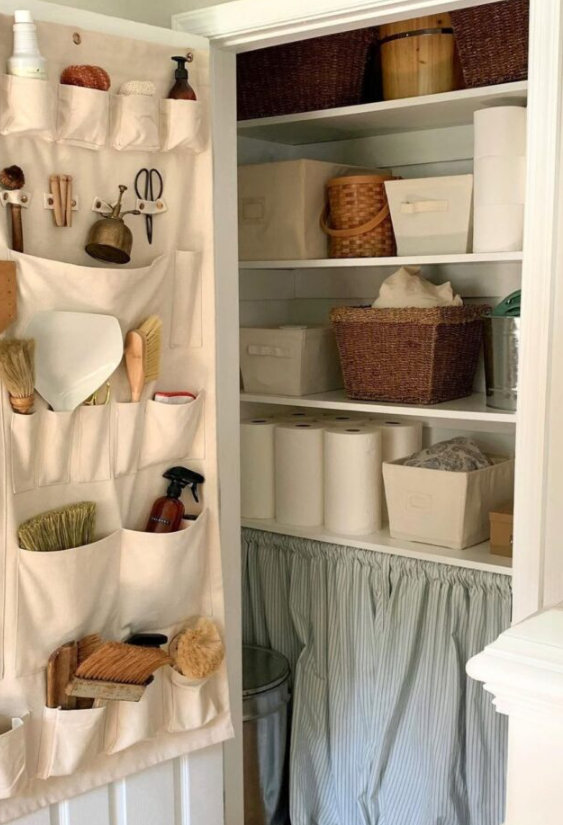
A hanging pocket organizer is a practical option when my closet contains lots of small items but very little spare shelf space. Its individual compartments can hold brushes, gloves, dusting cloths, small cleaning accessories, and other lightweight supplies that are easy to misplace.
I use the pockets for things I want to see at a glance rather than placing everything into one deep container. Larger items, such as paper towels, bulk refills, and buckets, stay on the shelves or floor where they have enough room.
I check the organizer’s pocket sizes before filling it and avoid putting heavy bottles into fabric compartments that are not designed to support them. This method works particularly well in compact utility closets where the main shelves are needed for bulkier household supplies.
Labeled Bins

Labels make a storage system easier to maintain because everyone in the household can tell where an item belongs. I label bins by their contents or purpose, such as cleaning cloths, bathroom supplies, laundry accessories, and spare household products.
I use labels that are easy to read from the front of the shelf. If a bin contains several different items, I keep the categories closely related so I do not have to search through unrelated supplies. Clear containers are helpful, but labels still make it easier to find the right bin quickly.
For a more efficient layout, I keep frequently used products at a comfortable height and reserve less accessible shelves for backup supplies. A small holder mounted under a shelf can also store paper towels without taking up space inside a bin. The goal is to make putting things away as simple as finding them.
Category Bins
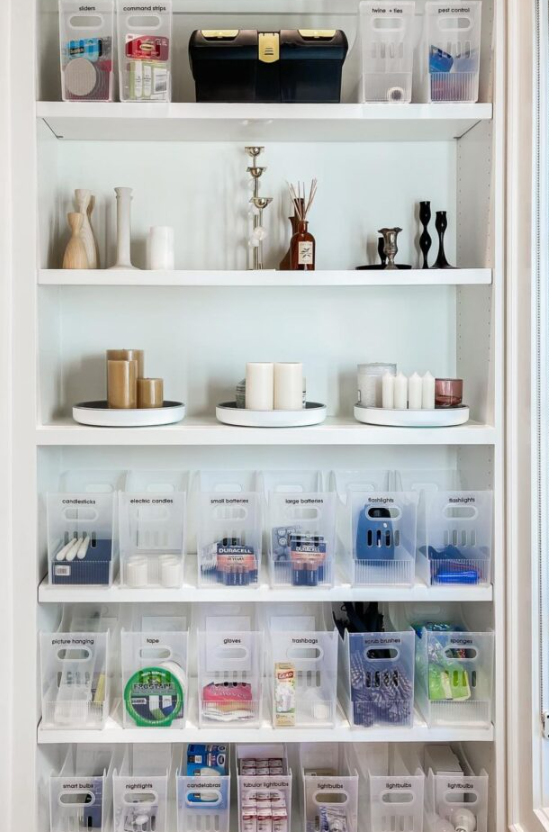
I sort small household essentials by function instead of allowing them to spread across the closet. Batteries, light bulbs, hooks, tape, spare cords, and basic repair supplies each get their own container, provided the items are safe to store together.
This approach helps me find small parts without emptying an entire shelf. I prefer clear bins with simple labels because I can see what is inside and quickly identify which supplies are running low.
I place the items I use most often on the middle shelves and move occasional-use supplies to higher storage areas. I also keep batteries and electrical accessories stored appropriately, away from moisture and cleaning chemicals. When each bin has one clear purpose, the closet becomes easier to manage and less likely to turn into a catch-all space.
Multi Storage
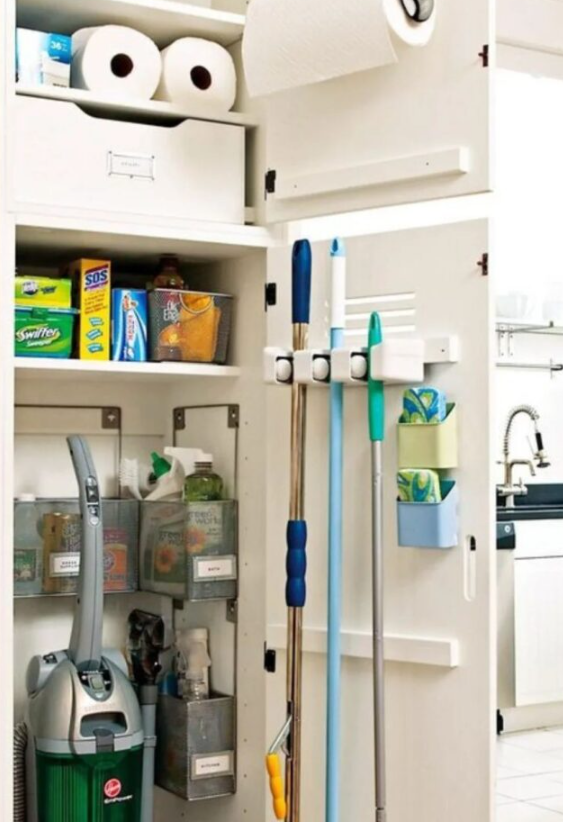
Sometimes, the best solution is to combine several storage methods instead of relying on shelves alone. I might use wall clips for brooms and mops, door baskets for small cleaning supplies, and clear bins for cloths, sponges, and replacement products.
Each storage feature handles a different type of item. The walls hold long tools, the door keeps lightweight essentials within reach, and the shelves support bottles, paper products, and larger containers. This layered approach makes use of space that might otherwise remain empty.
I plan the arrangement around the largest items first, such as a vacuum or bucket, then fit the shelves and smaller organizers around them. I also leave access to any pipes, valves, or electrical equipment that need to remain reachable. A practical layout should make everyday tasks easier, not simply fill every available surface.
Labeled Baskets
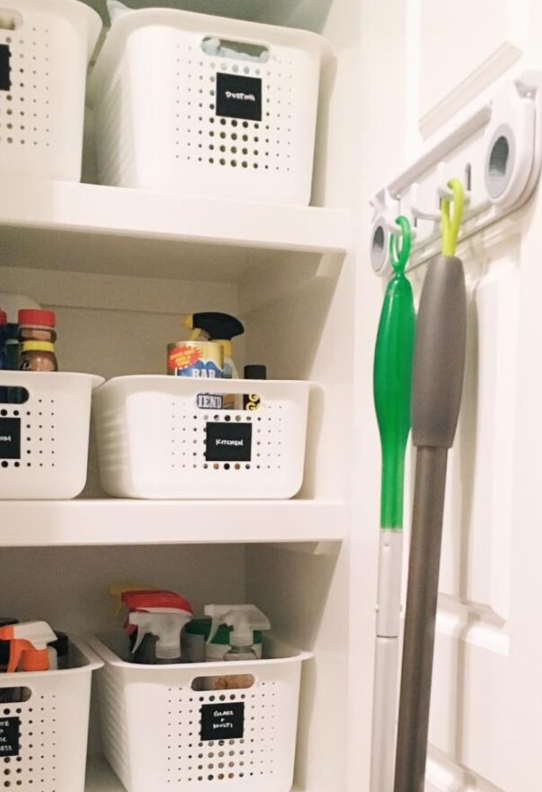
I use labeled baskets when I want to group cleaning products by room or task. One basket might hold bathroom cleaners, another could contain kitchen supplies, and a third could keep dusting cloths and general-purpose products together.
This arrangement makes it easier to carry the right supplies to another room without collecting each item separately. Baskets with openings or handles can be convenient, while labels help everyone return products to the correct place after use.
I check that the basket is strong enough for its contents and that bottles remain upright during handling. I also avoid combining chemicals or transferring products into unmarked containers. Keeping products in their original packaging helps preserve important safety instructions and warnings.
Double Walls
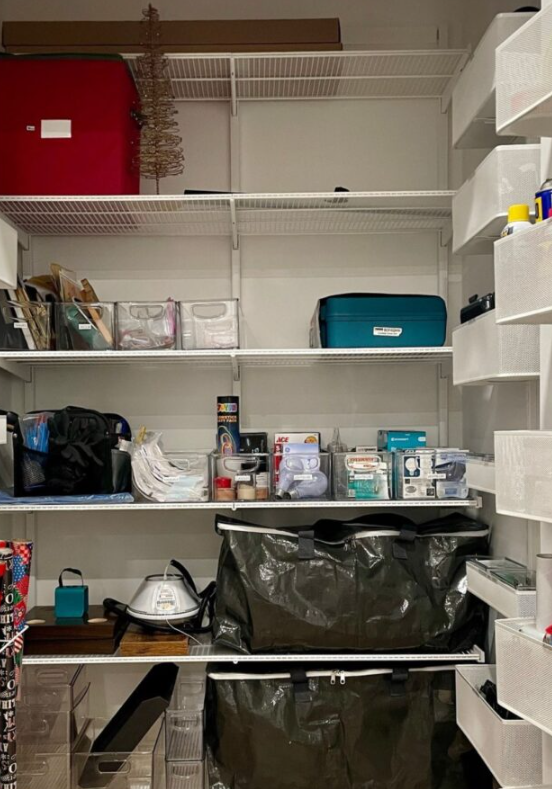
If my utility closet is wide enough, I look at both side walls before deciding where everything should go. Wall-mounted baskets or narrow shelving can create extra storage for small bottles, cloths, tools, and other items without crowding the central area.
I reserve the main shelves for larger bins and bulkier supplies, while the side baskets handle smaller products that would otherwise spread across the shelves. This creates separate storage zones and makes it easier to see what is available.
Before installing organizers on both walls, I check the closet’s width and make sure there is still enough room to reach the shelves and remove larger equipment. I avoid making the walkway so narrow that the vacuum or bucket becomes difficult to take out. This layout works best when side storage adds capacity without restricting access.
Rolling Rack
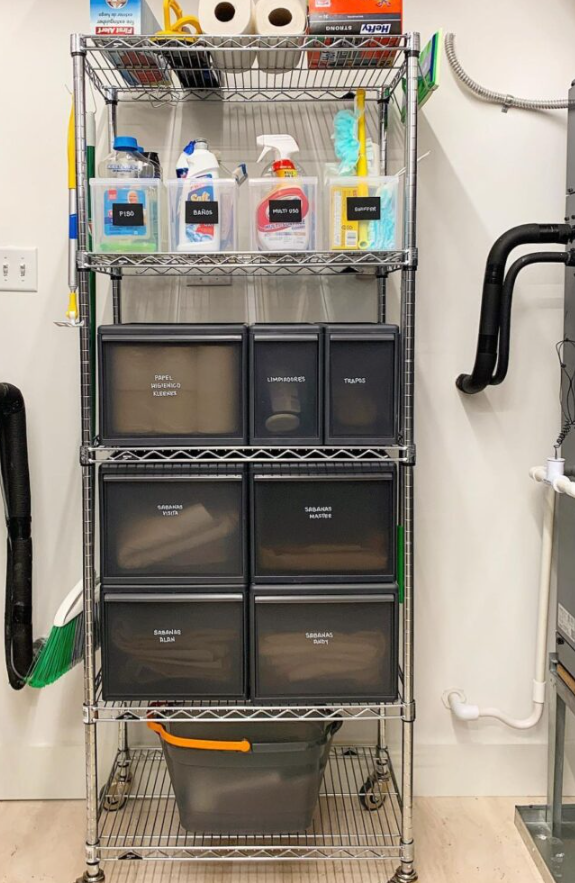
A rolling storage rack can be helpful when a utility closet needs flexible shelving or contains pipes and equipment that are difficult to reach. I can move the rack aside when I need to clean the floor or access the space behind it, provided the unit fits safely within the closet.
I use its shelves for cleaning supplies, cloths, gloves, and refill packs, grouping smaller items in containers to prevent them from sliding around. The top levels can hold lightweight, less frequently used products, while heavier items should sit lower to improve stability.
Before buying a rolling rack, I measure the doorway and interior space to make sure it can move in and out without getting stuck. I also check the wheel locks, shelf capacity, and overall stability. If the closet contains a water heater or other fixed equipment, I maintain the clearances required by the manufacturer and local safety rules.
Door Pegboard

A pegboard mounted on the inside of a utility closet door can provide adjustable storage for small tools and accessories. I can arrange hooks and small trays to hold scissors, tape, dusters, brushes, and other lightweight items that would otherwise clutter the shelves.
The main advantage is flexibility. When my storage needs change, I can reposition the hooks instead of installing an entirely new organizer. The shelves inside the closet then remain available for larger bins, cleaning supplies, and equipment.
I choose a pegboard system designed for the door and check that the mounting hardware can support its contents. I also test the door’s clearance before loading the board with items. Heavy tools or liquid-filled bottles are better stored on a properly rated shelf or holder rather than on a lightweight door panel.
Rail System

A wall-mounted rail system helps keep long cleaning tools organized in a small space. I use grip-style holders to secure brooms, mops, and dusters so they remain upright and do not fall into the walkway.
I can combine the rail with adjustable shelves for paper towels, refill bottles, and larger containers. Pull-out baskets are another useful option for cloths and sponges because they make the contents at the back easier to reach.
I plan the positions of the rail and shelves together, leaving enough clearance to remove each tool without disturbing nearby items. I also confirm that the wall and mounting hardware can support the load. A well-planned rail system keeps frequently used equipment accessible while preserving as much usable floor space as possible.
Divided Storage
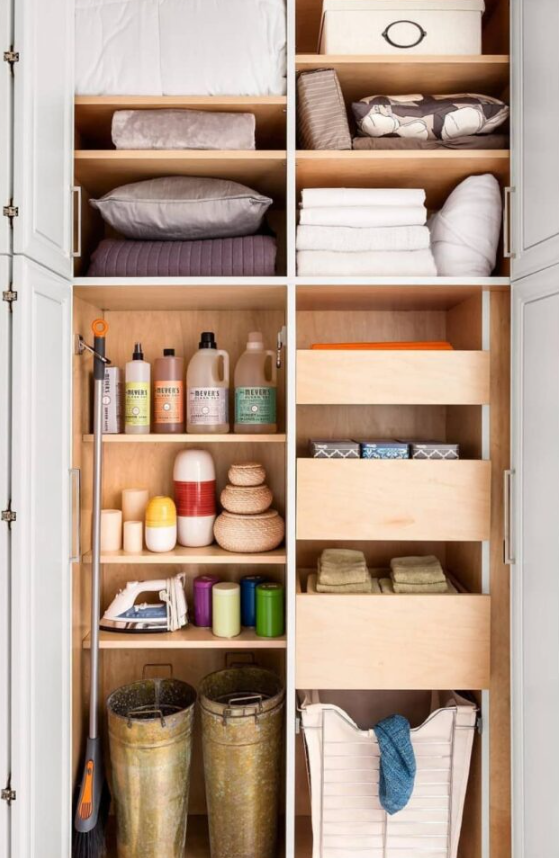
Dividing the closet into clear sections helps me store different types of household supplies without mixing everything together. I might reserve the upper shelves for lightweight backup stock, the middle section for everyday products, and the lower area for heavier equipment or bins.
If I need to store lots of small items, I use drawers or baskets to stop them from sliding around. Open shelves are useful for products I reach for often, while a separate vertical compartment can accommodate long tools such as brooms and mops.
I decide on the divisions after measuring the closet and identifying the items that need the most room. This prevents me from installing shelves that leave no space for tall equipment. I also keep heavy items low and make sure all shelves are securely installed before loading them.
Hanging Rod

A hanging rod can make use of space beneath an existing shelf. I use it for lightweight bags, cleaning aprons, or other items that can hang without blocking access to the shelves below.
Small hooks attached to a suitable rail can also hold lightweight brushes and accessories. Meanwhile, the upper shelf can store labeled bins containing cloths, gloves, and replacement supplies. Wall clips below or beside the rod keep long-handled tools upright.
I measure the clearance before installing the rod so hanging items do not interfere with bottles, equipment, or the closet door. I also check the rod’s weight limit and avoid hanging heavy containers from it. This is a straightforward way to create another storage layer without adding a full cabinet.
Center Column

When a closet has a wide enough opening, I consider leaving a dedicated central section for tall equipment. This gives a vacuum, mop, broom, or similar tool a clear place to stand instead of leaning against shelves or blocking the entrance.
The remaining shelves can hold bins, paper products, and everyday cleaning supplies. I group smaller items in containers so they do not spill into the open equipment area. Keeping the central section clear also makes it easier to remove bulky tools when I need them.
I would only use this layout if the closet is wide enough to provide comfortable access to both the equipment and the shelves. In a narrow closet, a side compartment is usually more practical. The best arrangement is the one that fits the actual shape of the space rather than forcing a layout that looks good but is difficult to use.
Clip Rack
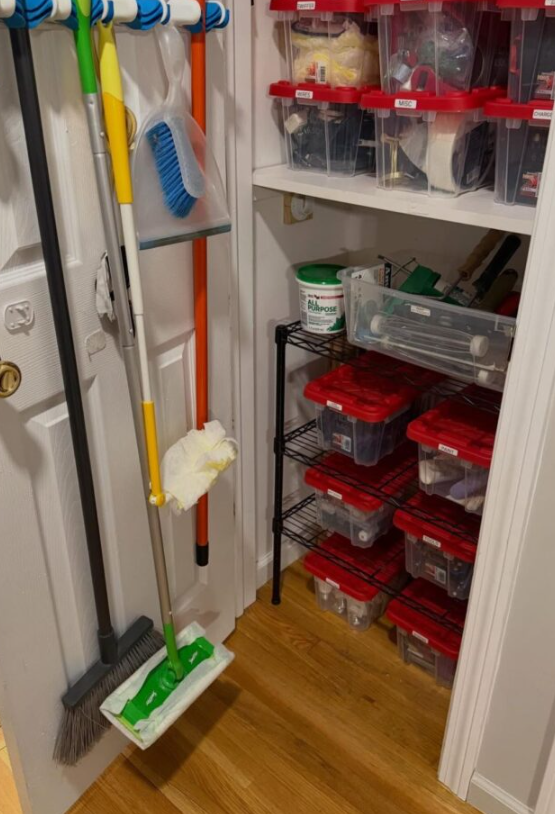
A clip rack is an easy way to organize long-handled tools in a crowded utility closet. Its gripping holders secure brooms, mops, and sweepers against a wall, helping prevent them from falling whenever another item is removed.
Once the handles are secured, I can use the floor for a compact bin or a vacuum accessory container. The nearby shelves can hold cleaning bottles, spare parts, cloths, and other household essentials.
I check the size and spacing of the clips before installing the rack because handles vary in thickness. I also follow the manufacturer’s mounting instructions and keep the heaviest tools within the rack’s rated capacity. Pairing the clip rack with labeled bins creates a simple system that is easy to maintain.
Vertical Divide
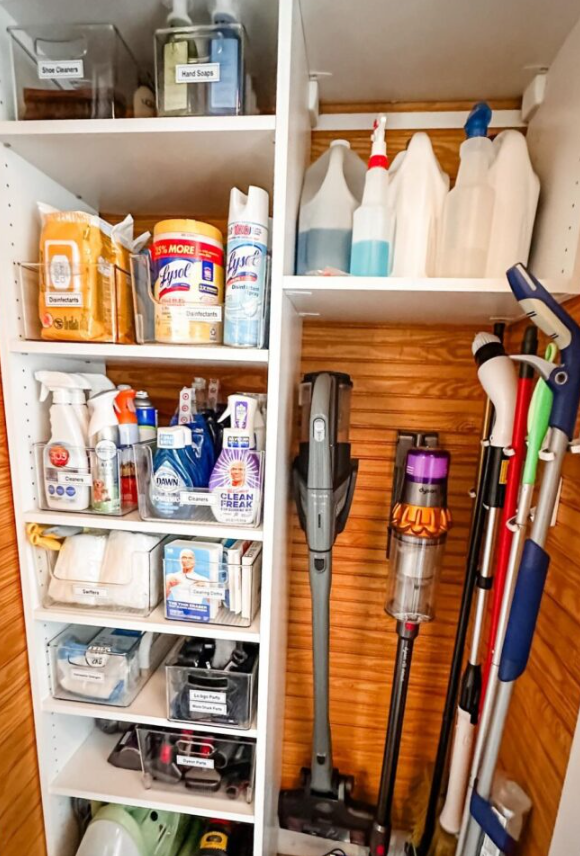
When a closet stores both tall equipment and smaller supplies, I find it useful to separate the space into two vertical sections. One side can hold a vacuum, mop, broom, or other long tool, while the other side contains shelves for bottles, cloths, and cleaning accessories.
This arrangement prevents long handles from getting tangled with other items and stops the shelves from becoming overcrowded. Clear containers make smaller supplies easier to identify, while the upper shelves can hold lightweight backup products that are used less frequently.
I measure the width needed for the largest tool before setting up the divider. I also make sure that the vacuum can be removed easily and that stored products do not block access to the back of the closet. Even a simple division can make a small storage area feel much more manageable.
Charging Station
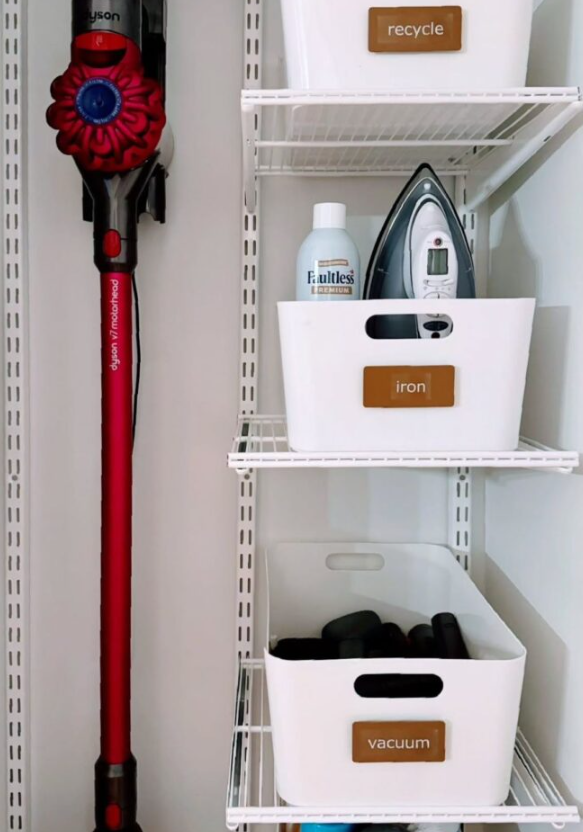
If I keep a cordless vacuum or other rechargeable cleaning device in the utility closet, I give it a designated storage and charging area. A compatible wall mount can keep the vacuum upright and free up valuable floor space, while a nearby shelf holds attachments and accessories.
I use a separate labeled bin for spare filters, brush heads, and other parts so they do not get mixed in with general cleaning supplies. Adjustable shelving can help accommodate equipment as my needs change.
Safety comes first when setting up a charging station. I follow the device manufacturer’s instructions for charging, ventilation, mounting, and battery storage. I keep electrical equipment away from spills and damp areas, avoid overloading outlets, and never assume that a crowded closet is suitable for charging just because the device fits inside it.
Side Baskets
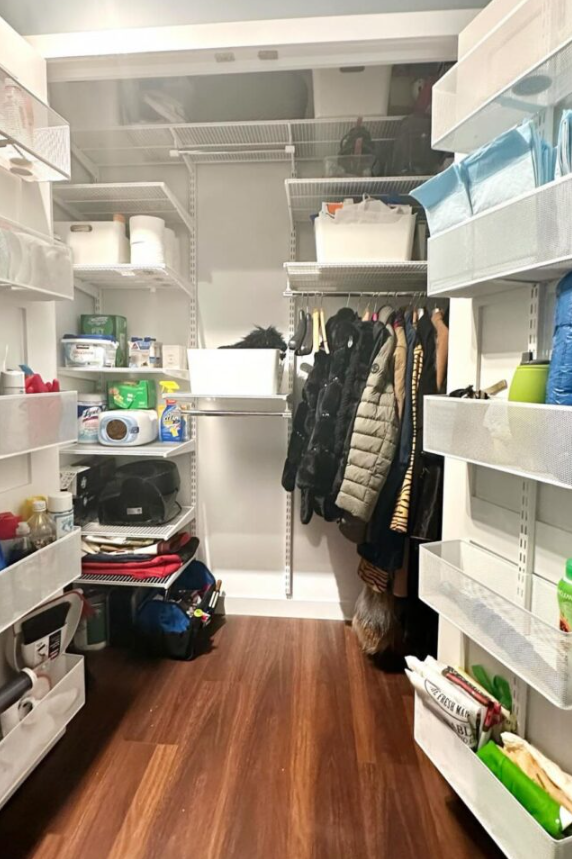
Slim baskets mounted along the side walls can create extra storage when the closet has enough width. I use them for lightweight bottles, cloths, gloves, and small accessories that would otherwise take up room on the main shelves.
The central shelves remain available for bulk supplies and larger containers, while the side baskets keep small items grouped together. This can make a deep closet easier to manage because frequently used products remain visible instead of disappearing behind larger objects.
Before installing side baskets on both walls, I check that the remaining space is wide enough for my hands and equipment. I also make sure the baskets will not catch on the door or prevent shelves from being accessed. In a very narrow closet, using only one wall may be a better choice.
Cabinet Tower
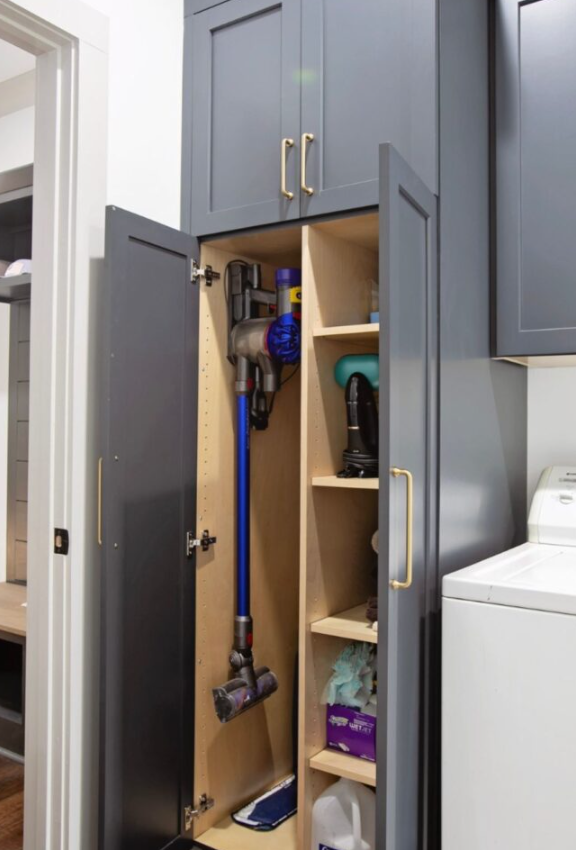
A slim cabinet tower can be a good solution when I want a more enclosed way to store tall cleaning equipment. One vertical compartment can accommodate a vacuum, broom, or mop, while the adjoining shelves hold smaller supplies and replacement products.
Adjustable shelves let me change the layout as the items I store change. I can keep everyday cleaners at an accessible height and reserve the upper section for lightweight backup supplies. Doors can also help create a neater appearance when the closet opens into a visible part of the home.
I measure the available width, depth, and height before choosing a cabinet. I also check whether the doors can open fully and whether the cabinet needs to be secured to the wall. In a laundry room or small utility area, a narrow cabinet with a separate tall compartment can make better use of the available space.
Shelf Labels
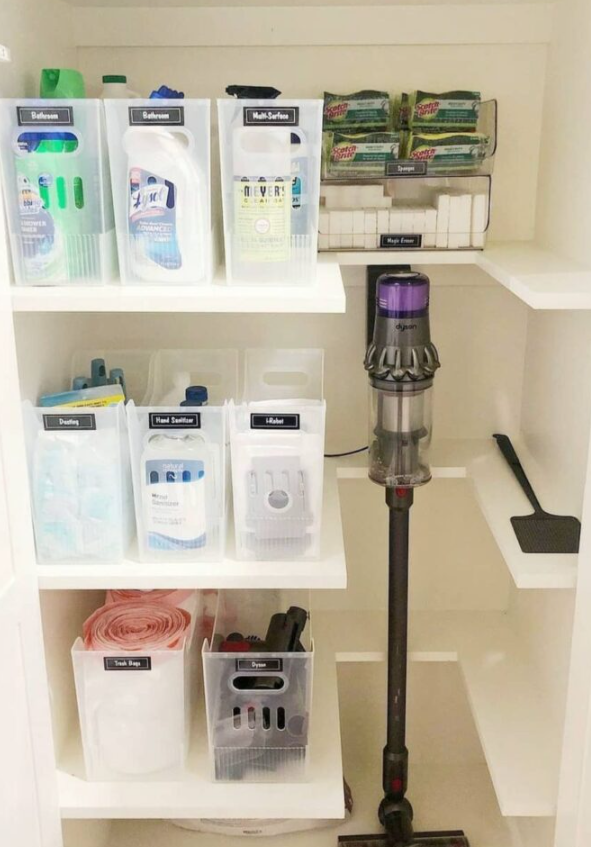
Shelf labels help me identify where different types of supplies belong. I might label one section for bathroom cleaning, another for general-purpose products, and another for cloths and spare household items.
I use short, readable labels and keep each category consistent across shelves and bins. That way, I can find a product quickly and return it to the same location without moving several containers around.
I also leave space for items that are used less often, such as spare garbage bags or unopened refills. These can go on a higher or lower shelf, depending on their weight and the available room. A labeled system works best when I avoid overfilling shelves and review the contents regularly.
FAQs
What should you keep in a utility closet to keep it organized?
I keep only the household supplies that make sense for the space, such as cleaning products, sponges, cloths, garbage bags, paper towels, brooms, mops, vacuum accessories, and basic repair tools. The exact contents depend on whether the closet also serves as a laundry or general storage area.
I group similar items into labeled bins and keep larger equipment in a separate section. I also avoid storing unnecessary duplicates, broken tools, or products that are no longer usable. Cleaning chemicals should remain in their original, labeled containers and be stored according to their instructions, away from children and pets.
How often should you reorganize a utility closet?
I recommend a quick check about once a month, with a more thorough review whenever the closet starts feeling crowded. During a short reset, I return misplaced items, wipe down shelves, check supplies, and remove empty packaging.
I also look for products that are running low so I can plan purchases instead of buying duplicates. A small amount of regular maintenance is usually easier than waiting until the entire closet needs to be emptied and reorganized.
The most important habit is returning each item to its assigned place after use. When shelves, bins, and tool holders have clear purposes, maintaining an organized utility closet becomes part of the normal household routine rather than a major project.