26 DIY Christmas Ornaments Ideas for 2026
Yes, I can make my own Christmas ornaments at home without expensive supplies or advanced crafting skills. With materials like felt, paper, yarn, wood slices, clay, fabric scraps, and clear baubles, I can create decorations that match my Christmas tree and home décor.
In this guide, I’m sharing 24 DIY Christmas ornament ideas, from mini yarn wreaths and felt mountains to painted baubles, paper angels, and tiny winter scenes. I’ll also cover simple ways to personalize each design, choose the right lighting, reuse household materials, and make ornaments that suit rustic, modern, vintage, or traditional Christmas themes.
Key Takeaways
- I can make attractive Christmas ornaments using affordable craft supplies and recycled materials.
- Felt, paper, yarn, clay, and clear baubles work well for different decorating styles.
- Handmade ornaments make thoughtful gifts and can become keepsakes for years to come.
- Matching ribbon colors, textures, and finishes helps create a coordinated Christmas tree.
- I should use suitable adhesives and keep small parts away from young children and pets.
Mini Yarn Wreath Ornaments
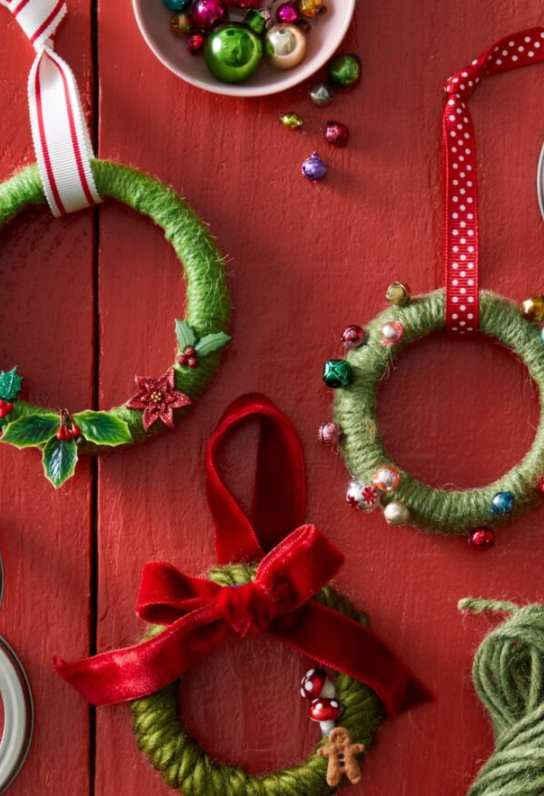
Mini yarn wreaths are a simple way to add a handmade touch to my Christmas tree. I can wrap green yarn around small rings made from cardboard, foam, or craft wire, securing the ends with craft glue.
To make each wreath stand out, I can add tiny beads, miniature bells, or a small ribbon bow. Using different shades of green creates a more natural look, while red and gold accents give the ornaments a traditional Christmas style.
I like pairing these wreaths with warm white tree lights because the soft glow brings out the yarn’s texture. A small hanging loop makes them easy to place on branches or attach to gift packages.
Felt Mountain Ornaments
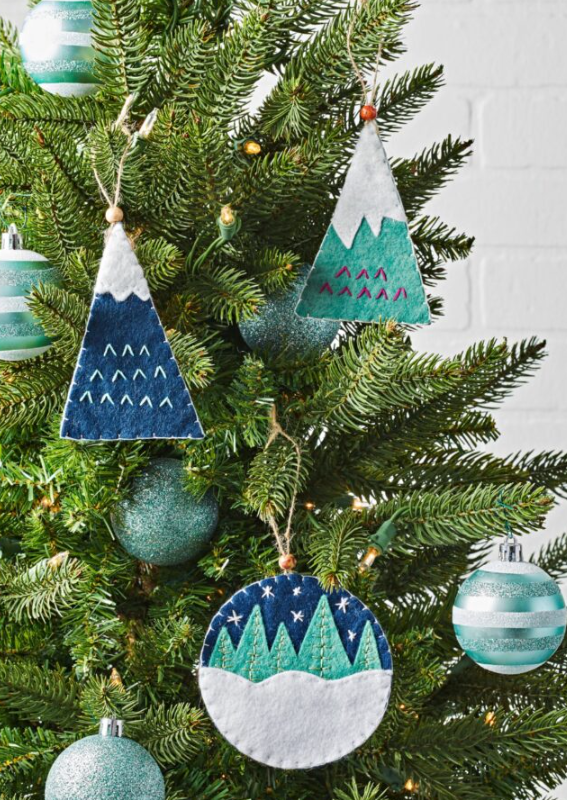
Felt mountain ornaments are a good choice when I want a simple winter design without too many decorative details. I can cut mountain shapes from blue, teal, gray, or white felt and layer smaller white pieces over the peaks to represent snow.
A few stitched lines or tiny embroidered dots can add detail without making the design look crowded. I can sew the layers together or use fabric glue if I want a quicker project.
Once finished, I can attach a piece of twine for hanging. These ornaments work especially well with white, silver, and pale blue decorations, making them suitable for a calm, snowy Christmas theme.
Mop Yarn Santa Ornaments
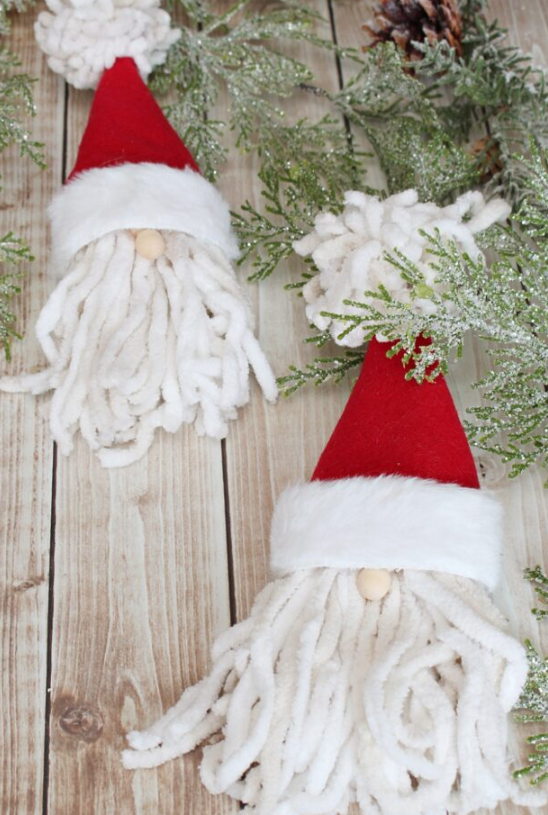
I can turn mop yarn, a small wooden bead, and a few felt scraps into a cheerful Santa ornament. The yarn forms Santa’s beard, while the wooden bead creates his face.
To complete the design, I can cut a red felt hat, add a strip of white felt around its base, and finish it with a small pom-pom. A dab of glue keeps the pieces in place, although I should allow enough drying time before hanging the ornament.
These Santas look lovely on family Christmas trees and can also be used as handmade gift decorations. If I make several, I can vary their beard lengths and hat shapes to give each one a slightly different appearance.
Bark Slice Wreath Ornaments

Bark slices bring a natural, woodland feel to Christmas decorations. I can use small, dry bark pieces as a base and attach miniature wreaths, green clay trees, or painted wooden beads to create a rustic design.
Before adding decorations, I should brush away loose dirt and make sure the bark is dry. A strong craft adhesive suitable for the materials will help secure the details, while jute twine creates a simple hanging loop.
These ornaments pair well with pinecones, wooden beads, dried orange slices, and warm golden lights. I can leave the bark natural for an earthy look or add a light coat of paint to create a snowy finish.
Folded Paper Pinecone Ornaments

Folded paper pinecones are a creative way to use leftover scrapbook paper or patterned cardstock. I can cut the paper into matching pieces, fold them into small sections, and layer the pieces until they form a pinecone-like shape.
Paper with plaid, botanical, or vintage patterns gives the ornament extra character. I can finish the top with a small ribbon bow and attach a loop of string for hanging.
For a neat result, I should use paper that holds its shape without becoming too thick to fold. These lightweight ornaments are easy to make in batches and work well on trees with neutral, farmhouse, or traditional decorations.
Botanical Clear Bauble Ornaments

Clear baubles allow me to create small botanical displays using dried moss, tiny pine sprigs, or other suitable dried greenery. I can place the materials inside a transparent ornament and close it securely before adding a ribbon or jute loop.
I prefer using lightweight, completely dry plant pieces so the arrangement stays neat and does not introduce unnecessary moisture. If I want a cleaner finish, I can use tweezers to position the greenery inside the bauble.
These ornaments suit minimalist and nature-inspired Christmas décor. Their transparent surfaces let the tree lights shine through, while the greenery adds a subtle touch of color.
Metal Washer Snowflake Ornaments
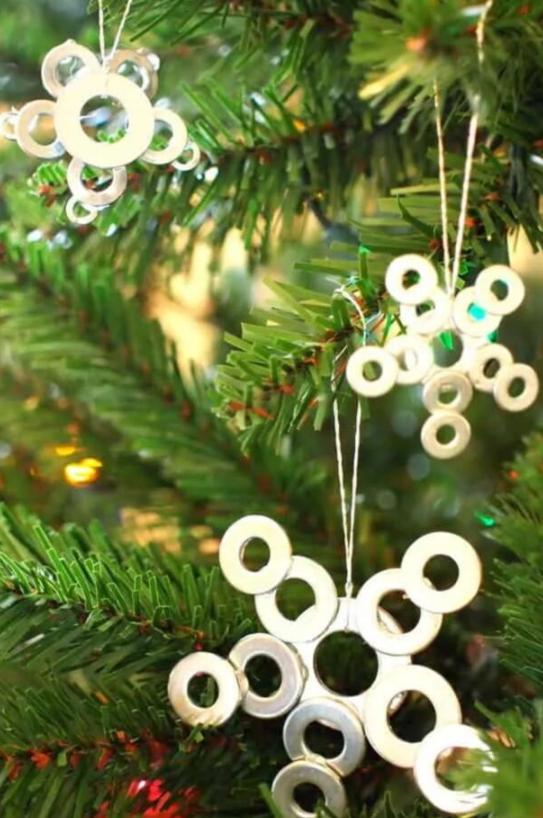
Metal washers can become simple snowflake ornaments with a little creativity. I can arrange several washers into a symmetrical pattern, secure them with suitable metal adhesive, and add small beads or decorative pieces to fill the center.
Once the adhesive has cured, I can paint the design white, silver, or icy blue. A small ribbon or strong thread provides a hanging loop, while a light coat of clear sealant can help protect the finish when appropriate for the materials used.
These ornaments have a clean, geometric appearance that works well with modern Christmas decorations. Before hanging them, I should check that all pieces are firmly attached and that no sharp edges remain.
Clay Photo Frame Ornaments

Clay photo frame ornaments let me display favorite family memories on the Christmas tree. I can roll out air-dry clay, cut it into a circle or square, and make an opening in the center for a small photograph.
While the clay is still workable, I can add a simple border, tiny stars, a wreath pattern, or small reindeer details. I should follow the clay manufacturer’s drying instructions and make a hanging hole before the piece hardens.
After the ornament is fully dry, I can paint it or leave it in a natural finish. I can attach the photo with a suitable adhesive or removable backing so it is easier to replace later. These ornaments also make thoughtful personalized gifts for family members.
Snow Globe Scene Ornament
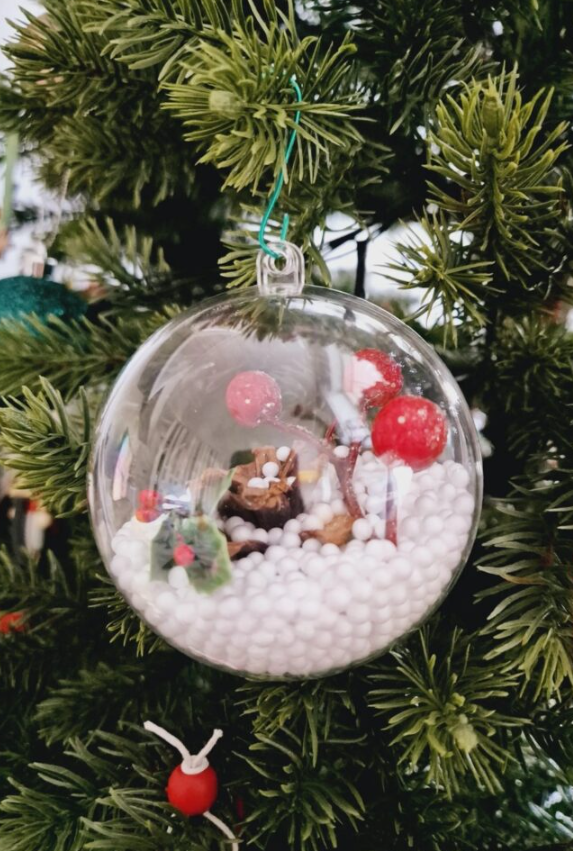
A snow globe ornament creates the look of a tiny winter scene inside a clear bauble. I can use miniature trees, small figurines, and white craft foam beads to build a snowy setting inside a suitable transparent ornament.
I should choose decorations small enough to fit through the opening and secure any pieces that need to stay in position. A pair of tweezers can make arranging the scene much easier.
Once everything is in place, I can close the ornament securely and add a ribbon for hanging. I should avoid using loose materials that could spill out, especially if children or pets may handle the decoration.
Wood Slice Christmas Tree Ornament

Wood slices make an attractive base for rustic Christmas ornaments. I can arrange small green beads, felt pieces, or miniature pom-poms in the shape of a Christmas tree, using a thin twig or painted line as the trunk.
A tiny star or snowflake at the top adds a finishing detail. I can leave the wood natural or lightly sand the surface before decorating it, making sure there are no rough edges that could catch on tree branches.
These ornaments look especially good with burlap ribbon, pinecones, and wooden decorations. A simple hanging loop completes the design and makes it easy to display year after year.
Lid Cap Diorama Ornaments
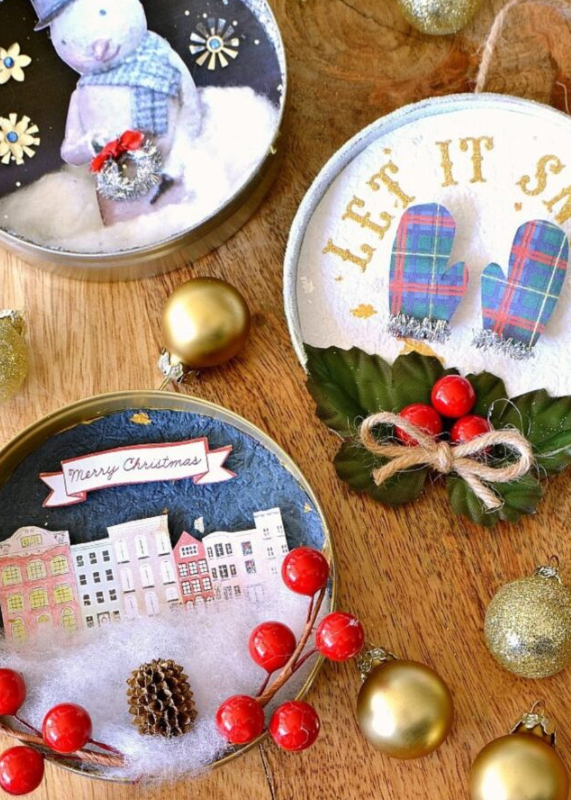
Small metal lids can be used to make miniature Christmas scenes. I can paint the inside of a clean lid, then add tiny figurines, paper houses, miniature trees, or small winter-themed cutouts.
For extra detail, I can attach artificial snow, holly leaves, or decorative berries around the scene. A ribbon or twine loop can be secured to the back once the decoration is complete.
The shallow space inside the lid creates a little frame around the scene, giving the ornament a miniature picture-box effect. These decorations work particularly well with vintage, farmhouse, and traditional Christmas themes.
Felt Cookie Ornaments
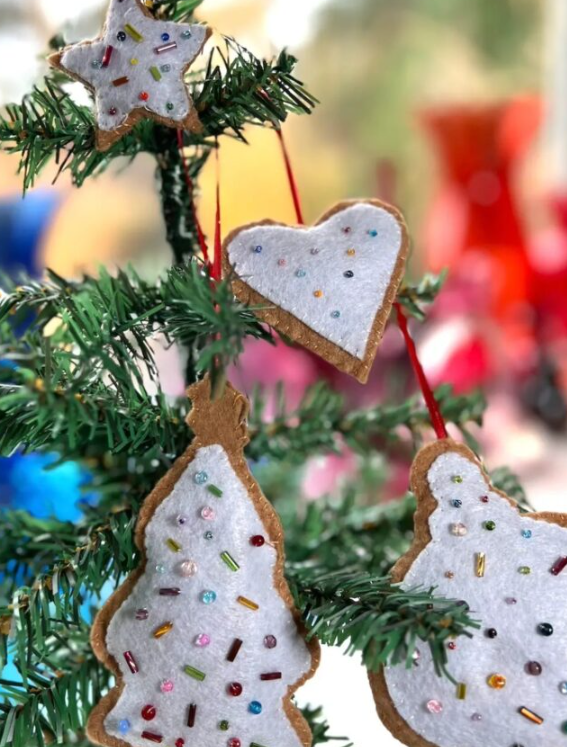
Felt cookie ornaments bring a playful bakery theme to my Christmas tree without using real food. I can cut brown felt into shapes such as gingerbread people, stars, candy canes, or Christmas trees, then add white felt or embroidery to imitate icing.
For a fuller ornament, I can sew two matching shapes together and add a little stuffing before closing the seam. Small beads, buttons, or stitched dots can represent sprinkles, but embroidered details are a safer choice when the ornaments will be handled by young children.
A red ribbon makes a cheerful finishing touch. I can make a matching set of cookies in different shapes for a coordinated candy-themed tree.
Peppermint Candy Stocking Ornament

A peppermint stocking ornament adds bright red-and-white color to Christmas decorations. One option is to use a stocking-shaped cookie cutter and arrange hard peppermint candies inside it on a baking tray lined with a suitable nonstick baking surface.
I should follow a tested melting method, supervise the oven carefully, and let the candy cool completely before handling it. Once the piece is firm, a small hole can be made only if the chosen method and material allow it safely; an easier alternative is to attach a ribbon with suitable craft adhesive.
Because candy can become sticky in humid conditions and may attract insects, I would keep these ornaments away from heat and consider using a non-edible imitation for decorations intended to last several seasons.
Vintage Card Art Ornament

Old Christmas cards can become charming keepsakes when I turn their artwork into ornaments. I can cut out a favorite illustration and attach it to a sturdy cardboard or thin wooden base.
To protect the design, I can apply a suitable craft sealer according to its instructions. A little artificial snow, a narrow border, or a small amount of glitter can add detail without covering the original picture.
I can finish the ornament with jute string or a ribbon that matches the card’s colors. This is also a practical way to reuse meaningful holiday cards instead of leaving them stored away after Christmas.
Plaid Fabric Scrap Wreath Ornament
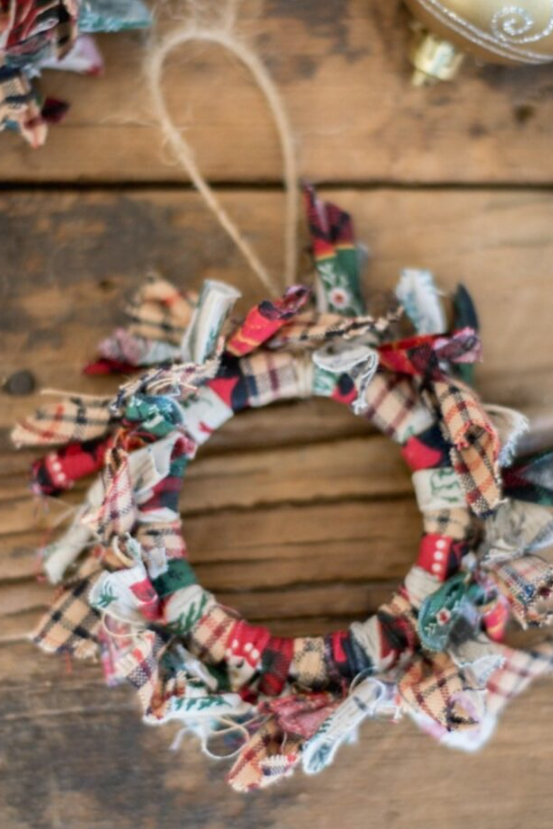
A plaid fabric wreath is a good project for using leftover material from sewing or other crafts. I can cut the fabric into short strips and tie or secure them around a small wire frame or embroidery hoop until the wreath looks full.
Red, green, cream, and black plaid create a classic Christmas appearance, while softer neutral checks work well with farmhouse décor. I can trim uneven fabric ends and add a small bow or a few lightweight decorative berries.
A jute loop makes the wreath easy to hang. Since the fabric creates most of the texture, I can keep the extra decorations simple for a balanced finish.
Character Glitter Bauble Ornaments
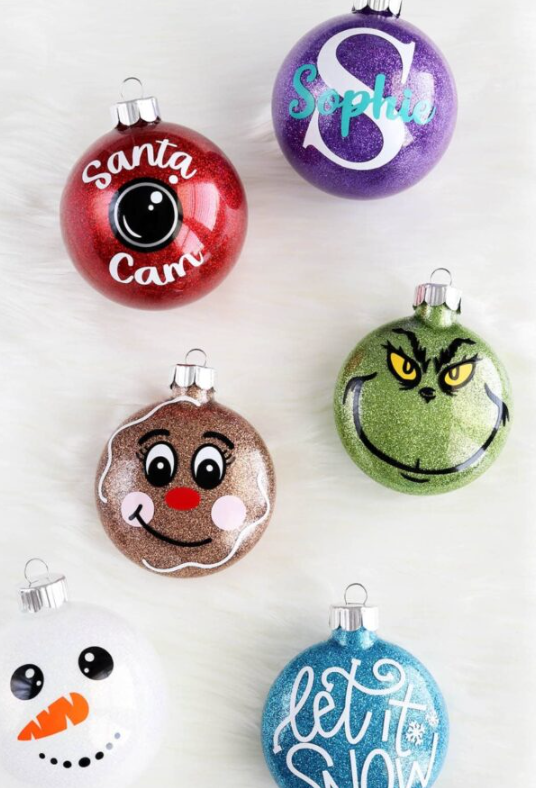
Character baubles add a fun element to a family Christmas tree. I can decorate clear ornaments with painted faces or suitable vinyl shapes inspired by familiar holiday characters such as reindeer, snowmen, or playful green Christmas figures.
For extra sparkle, I can use a bauble designed for craft glitter and follow the instructions for the chosen adhesive or coating. I should avoid mixing incompatible materials or using products that are not intended for the ornament’s surface.
Bright colors work well for playful designs, while simple facial details keep the characters recognizable. If I am decorating with children, washable paints and larger, securely attached decorations can make the project easier to manage.
Textured Earth-Tone Bauble Ornaments
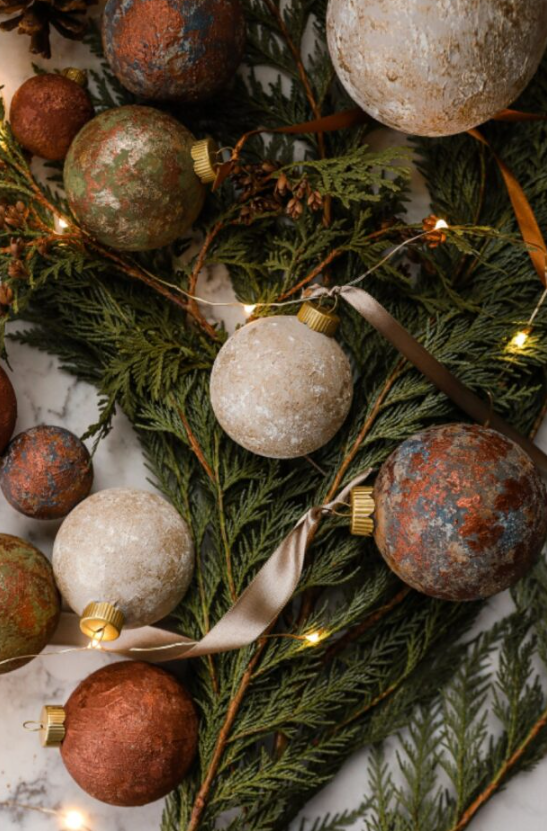
Earth-tone baubles offer a softer alternative to bright, traditional Christmas colors. I can use terracotta, beige, warm brown, cream, or muted green paint to give plain ornaments a natural appearance.
For a textured finish, I can dab the paint on with a sponge instead of brushing it on smoothly. After the paint dries, I can use a compatible matte sealer if the ornament’s material requires extra protection.
Velvet or silk-style ribbon adds a polished finishing touch. These baubles work especially well with wooden beads, dried greenery, linen decorations, and warm white tree lights.
Fabric Tree Ornaments
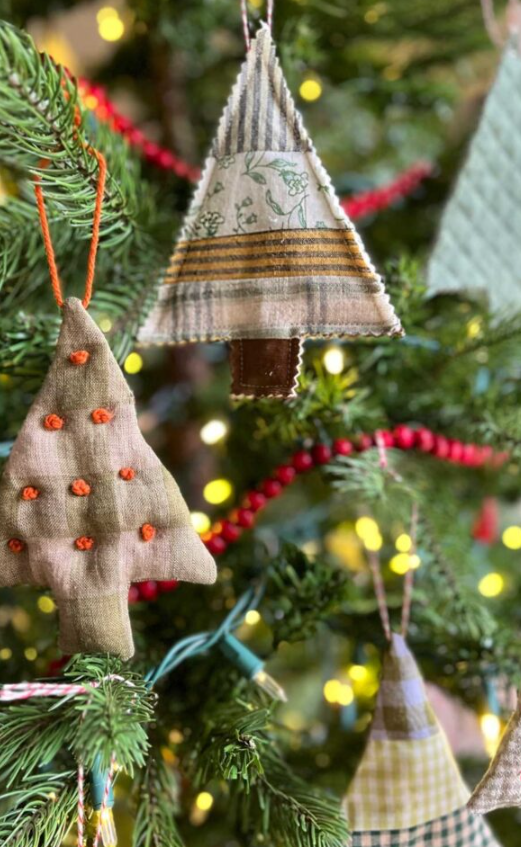
Fabric tree ornaments are easy to customize using scraps left over from other sewing projects. I can cut two matching Christmas tree shapes from patterned fabric, sew around the edges, and leave a small opening for stuffing.
A little cotton or suitable craft filling gives the ornament shape without making it too heavy. Once the opening is closed, I can add small buttons, embroidered dots, or a stitched star at the top.
If I prefer not to sew, I can use fabric glue designed for the materials involved. These ornaments are a good fit for vintage, cottage, and farmhouse Christmas styles, especially when I mix several coordinating fabric patterns.
Swirled Paint Bauble Ornaments
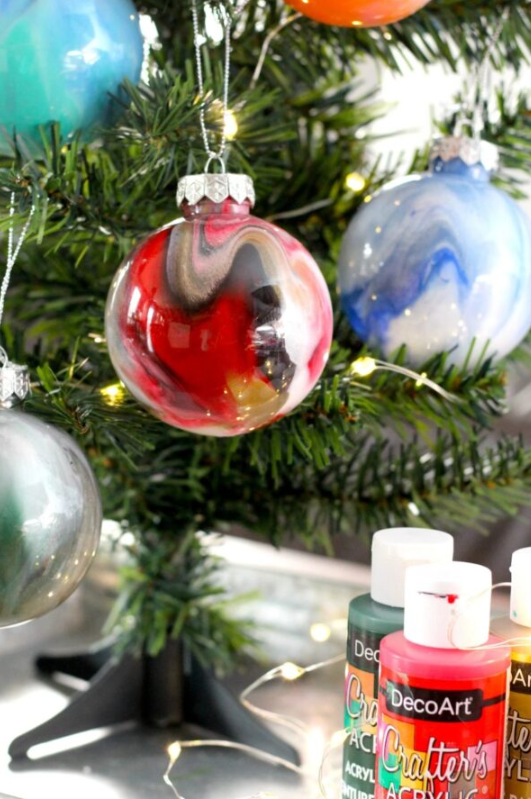
Swirled paint baubles allow me to create a different design on every ornament. I can add a few drops of compatible acrylic craft paint to a clear ornament and gently rotate it so the colors move across the inside surface.
Two or three coordinating shades usually create a more defined pattern than using too many colors at once. I should check whether the paint is suitable for the ornament material and allow it to dry fully before closing or hanging the bauble.
Pastels create a softer look, while red, green, gold, and white suit a traditional Christmas tree. Since each swirl forms differently, this project is useful when I want a matching set without making every ornament identical.
Vintage Bulb Pinecone Ornaments
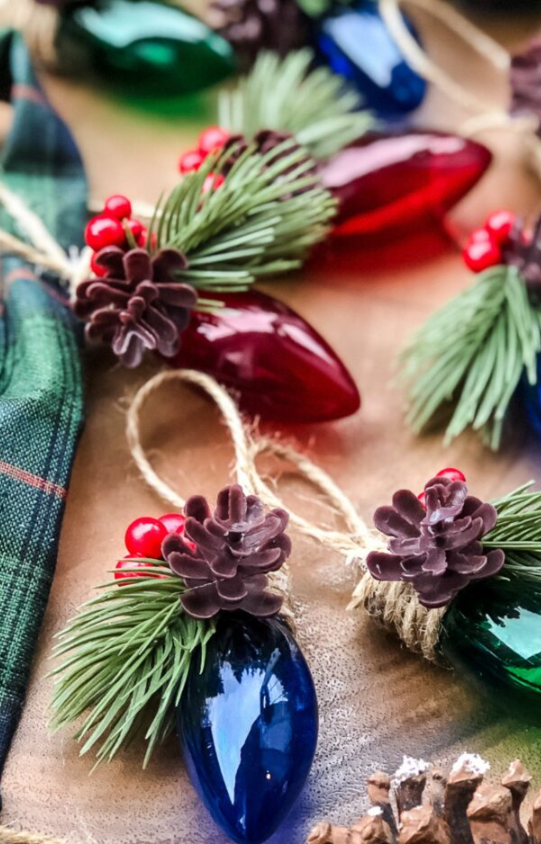
Old-fashioned bulb-shaped ornaments can be decorated with small pinecones, artificial greenery, and red berries for a woodland-inspired design. I can wrap the lower section of a suitable plastic or glass bulb ornament with jute and attach the greenery near the top.
I should make sure the ornament is clean and dry before adding any decorations. Lightweight embellishments are best because heavy pieces can make the ornament difficult to hang securely.
The combination of natural-looking materials and a bulb shape gives the design a nostalgic appearance. I can use several similar ornaments together or mix them with plain wooden decorations for a balanced tree.
Bottle Brush Forest Ornament
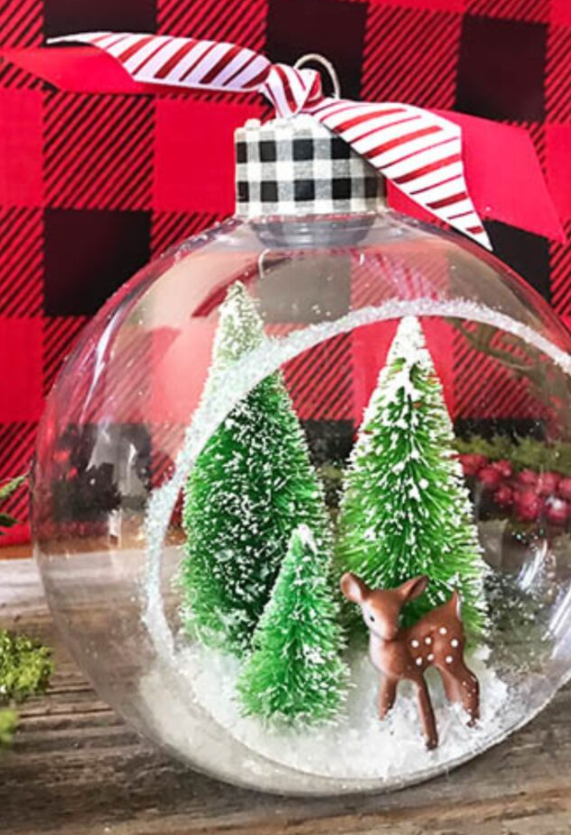
A bottle brush forest ornament creates the look of a tiny snowy landscape inside a clear bauble or display container. I can place one or more miniature bottle brush trees inside and add a small amount of artificial snow around their bases.
A tiny deer or other suitable figurine can complete the scene, provided it fits comfortably without pressing against the sides. Tweezers help me arrange the trees and decorations, especially when the opening is narrow.
I can finish the ornament with a patterned ribbon that matches the rest of my Christmas décor. These miniature scenes look especially attractive with woodland decorations, natural greenery, and warm white lights.
Folded Book Page Angel Ornaments
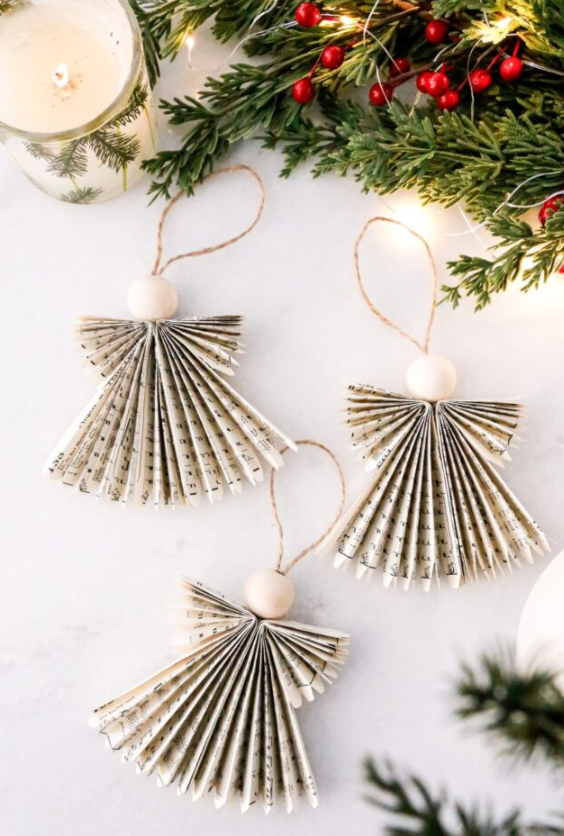
Folded book page angels offer a lightweight, vintage-style decoration. I can fold paper into an accordion shape to create the angel’s gown and wings, then attach a wooden bead as the head.
After arranging the folds, I can secure the center with thread or craft glue and add a loop for hanging. A small paper halo or a little twine detail can complete the design without making it too busy.
I would use paper from damaged books, old sheet music, or printed craft sheets rather than cutting up books that are still in good condition. These angels pair nicely with neutral ornaments, wooden beads, and soft white lighting.
3D Paper Ornament Balls
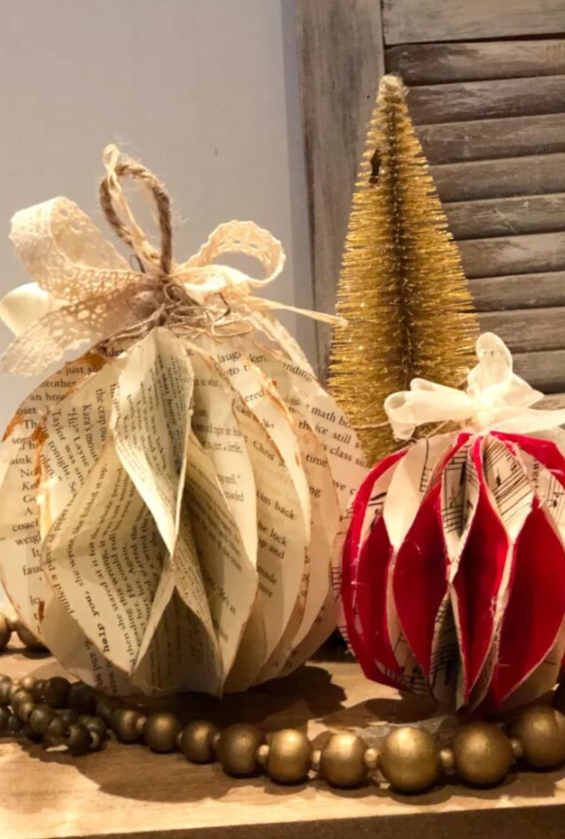
Three-dimensional paper balls add depth to a Christmas tree without requiring expensive materials. I can cut several matching circles from patterned cardstock or decorative paper, fold each circle in half, and glue the folded sides together to form a rounded shape.
Before sealing the final section, I can add a thread loop for hanging. Using paper in coordinated colors creates a neat collection, while alternating patterns gives the ornaments a more playful look.
These paper decorations are lightweight and easy to store flat or carefully fold when possible. They are also a useful project for repurposing leftover craft paper from birthdays, gift wrapping, or other celebrations.
Tin Lid Snow Scene Ornament
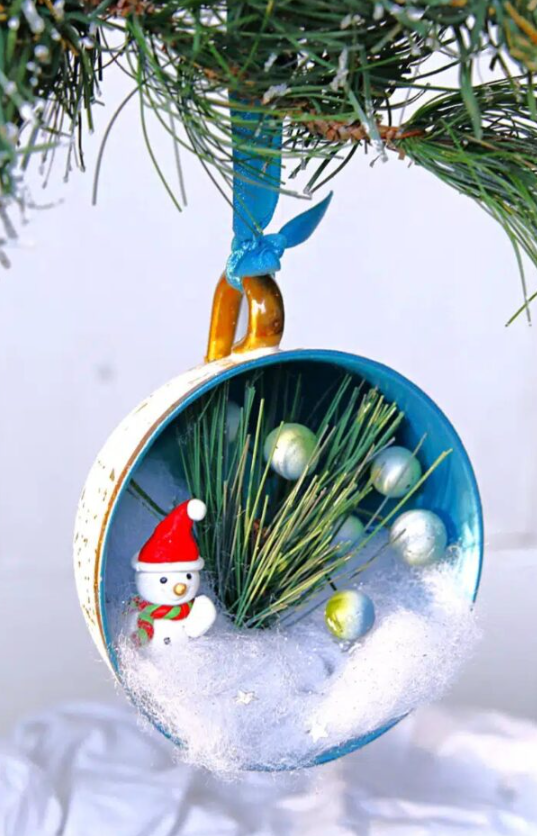
A tin lid can serve as the frame for a small winter scene. I can paint the inside in a snowy color, then attach a miniature snowman, artificial greenery, and a little decorative snow to create depth.
A bright ribbon adds contrast against the pale background. If I use a metal lid, I should check the rim for sharp edges and cover or smooth them before handling or hanging the ornament.
Once the scene is secure, I can attach a hanging loop to the back. The metal border gives the decoration a framed appearance, making it a good addition to vintage or rustic Christmas décor.
Felt Holly Berry Ornament
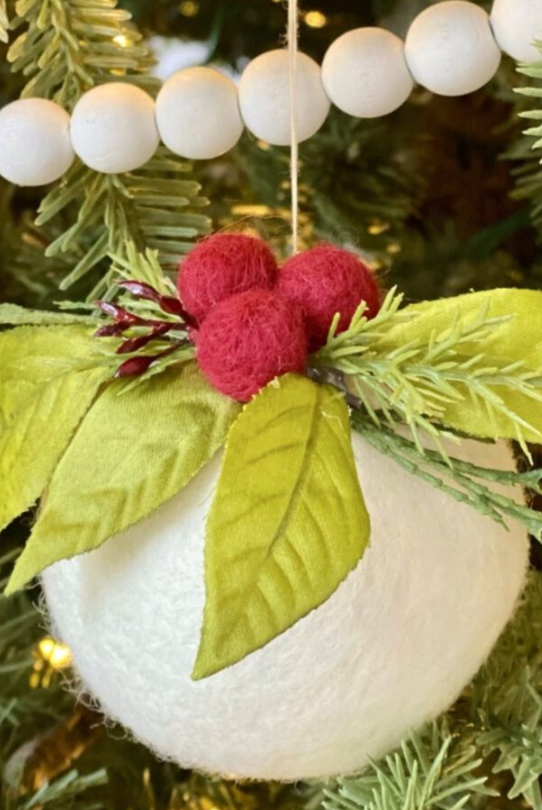
Felt holly ornaments are simple to make and bring a traditional Christmas look to the tree. I can cut several green felt leaves, shape their edges with small snips, and attach red felt circles or pom-poms to represent berries.
A white felt ball or foam base can provide contrast, or I can arrange the leaves and berries into a small wreath. Sewing the pieces in place can create a sturdy finish, while suitable fabric glue offers a quicker option.
I can use twine or ribbon for hanging, depending on the style of my tree. These ornaments look good alongside plaid fabric decorations, wooden pieces, and other handmade greenery.
Epsom Salt Frosted Ornament
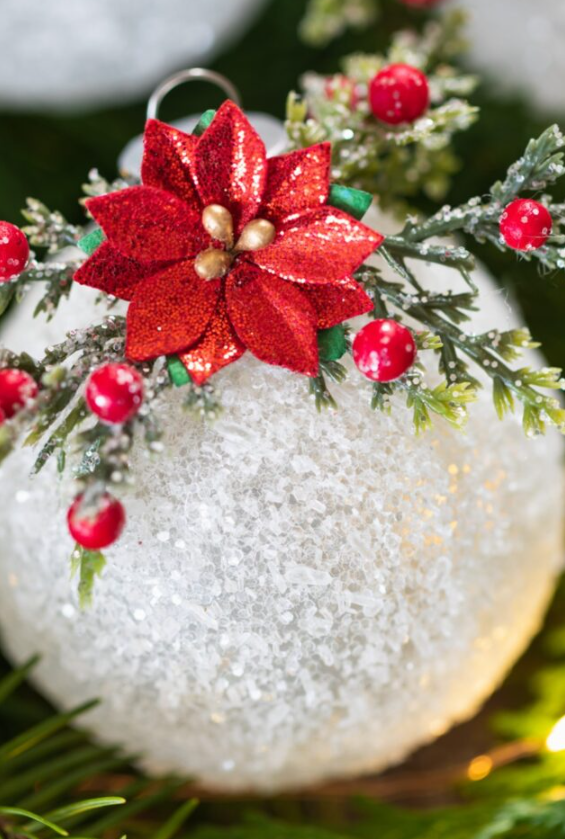
Epsom salt can create a frosted effect on certain Christmas decorations. I can coat the outside of a suitable ornament with craft glue and carefully sprinkle salt over the surface, following the adhesive manufacturer’s instructions.
After the glue dries completely, I can add artificial greenery, red berries, or a small decorative flower to the top. A ribbon loop provides a simple finish, while a clear sealant may help reduce shedding if it is compatible with the materials.
The salt crystals can catch the light and resemble a light layer of frost. I should keep the ornament dry and avoid using this method on surfaces where the adhesive or salt could damage the finish.
FAQs
What Is the Most Common Ornament?
The classic spherical Christmas bauble is one of the most widely used tree decorations. It comes in many materials, including glass, plastic, metal, and handmade finishes, so it suits almost any decorating style.
I can buy plain baubles or make my own by painting the surface, adding patterns, or filling clear versions with suitable decorative materials. Red, gold, silver, green, and white remain useful choices for traditional Christmas color schemes, while neutral shades work well in modern spaces.
What Is Used to Make Ornaments?
Christmas ornaments can be made from materials such as felt, wood, clay, paper, metal, fabric, glass, and plastic. I can also reuse items like cardboard, old greeting cards, small lids, and leftover yarn to reduce craft waste.
Natural materials such as pinecones and dried greenery can add texture, while paint, ribbon, thread, and craft glue help hold a design together. I should choose materials based on the ornament’s weight, intended use, and whether it will be handled by children or pets.
The best starting point is to use supplies I already have, choose a design that matches my Christmas theme, and make one ornament before preparing a full set. That way, I can test the colors, size, and materials before spending more time on the project.