21 DIY Plant Stand Ideas for 2026
21 DIY Plant Stand Ideas to Organize and Display Your Plants
I love how a few plants can make a room feel more welcoming. But as a plant collection grows, finding space for every pot becomes a challenge. Windowsills fill up, side tables get crowded, and empty corners slowly disappear.
That is why DIY plant stands are so useful. They help organize plants, add height to a display, and make better use of the space you already have. You can build a simple wooden stand, reuse an old table, create hanging shelves, or turn a pallet into a vertical garden without spending a lot of money.
In this guide, I’m sharing 21 DIY plant stand ideas for living rooms, bedrooms, balconies, porches, patios, and gardens. I’ll also cover practical details to consider before building, including weight capacity, drainage, materials, stability, and light requirements.
Key Takeaways
- For small rooms: Hanging planters, slim metal stands, and vertical shelves help save floor space.
- For large plant collections: A long bench, tiered stand, or garden station keeps pots organized.
- For budget projects: Repurposed tables, reclaimed timber, and suitable pallets can reduce material costs.
- For outdoor displays: Choose weather-resistant materials and protect wooden surfaces from moisture.
- Before building: Check the stand’s stability, weight capacity, drainage, and the amount of light each plant needs.
Before You Build a DIY Plant Stand
Before I start a DIY plant stand project, I consider where I want to place it and which plants it needs to hold. A design that works well in a living room may not be suitable for a damp patio or a sunny balcony.
For indoor use, I look for a stand that fits the available space without blocking walkways. If I plan to place it near children or pets, I also pay attention to its base, height, and overall stability.
For outdoor projects, I choose materials that can handle moisture and changing temperatures. Weather-resistant timber, suitable exterior finishes, and rust-resistant hardware can help a stand last longer.
Lighting is another important factor. Raising a plant closer to a window may help it receive more light, but taller plants can also shade smaller ones. I arrange the pots according to their individual light needs instead of filling every shelf just to create a full display.
Finally, I check how much weight the stand can support. A pot containing wet soil can be considerably heavier than an empty container, so shelves, benches, and hanging supports need to be strong enough for the complete setup.
With these details in mind, I can choose a design that looks good and works well for everyday plant care.
1. Clean Wooden Plant Stands
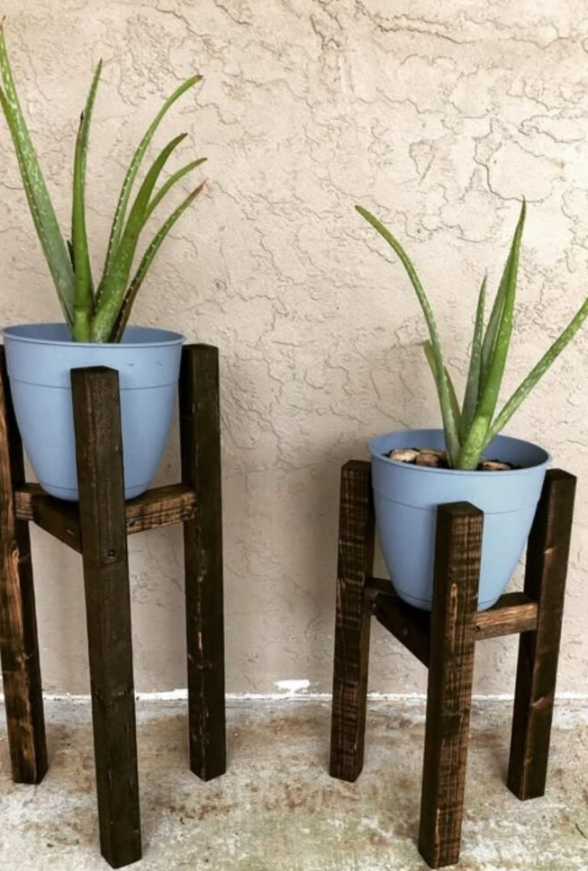
A simple wooden plant stand is a good starting point if I want a clean, timeless look without a complicated building project. Its basic structure can consist of four legs, a square or rectangular top, and secure joints.
I can leave the wood unfinished for a natural appearance, apply a stain to bring out the grain, or paint it to complement the room. The right finish helps the stand fit into modern, rustic, or traditional interiors.
One trick I like is making two or three stands at different heights. Grouping them together creates a layered display and gives each plant more visual space than placing every pot at the same level.
These stands work well beside sofas, near windows, or in empty bedroom corners. For the best result, I match the platform size to the pot and make sure the legs can support its full weight.
2. Create a Hanging Plant Corner
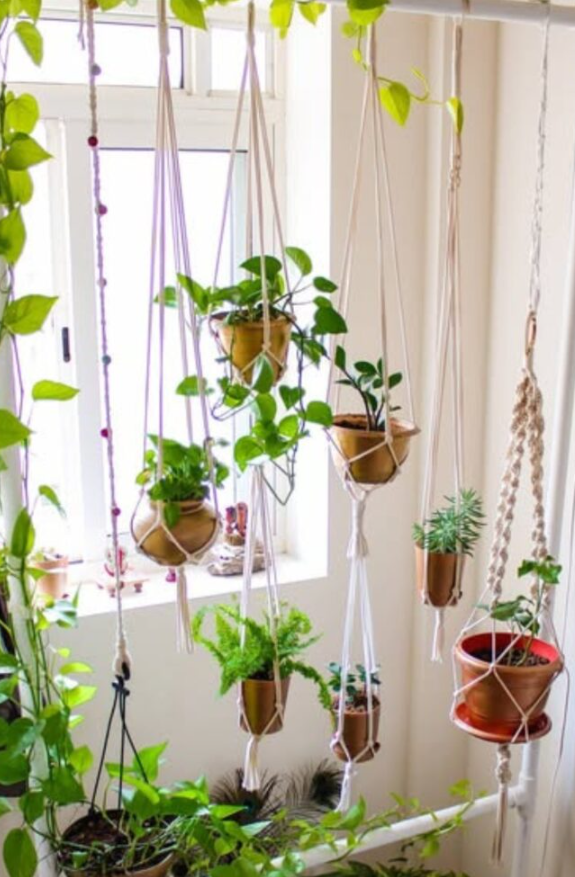
When floor space is limited, I look for ways to use the wall and ceiling areas instead. A hanging plant corner lets me display several plants without adding another table or shelf to the room.
I can combine hanging baskets, rope planters, and macramé hangers at different heights to create a relaxed arrangement. Plants with trailing leaves are particularly suitable because their growth naturally fills the open space below each pot.
For a coordinated look, I might use similar hanger materials while varying the pot sizes and plant shapes. This keeps the arrangement connected without making every planter look identical.
Safety is essential with hanging displays. I use mounting hardware suited to the ceiling or wall structure and account for the weight of the pot, wet soil, and mature plant. I also keep hanging pots away from areas where people could bump into them.
3. Build a Full Garden Plant Station

If I have a large collection of plants, a single stand may not provide enough room. A full garden plant station brings hanging baskets, herbs, flowering plants, and larger pots together in one organized area.
A pergola-style frame is a useful design for a patio or garden. The upper beam can support hanging baskets, while lower shelves hold pots and gardening supplies. Depending on the available space, I can add a work surface or extra planter boxes.
This setup also helps turn an unused outdoor corner into a dedicated garden feature. Instead of spreading containers around the patio, I can arrange them by size, plant type, or sunlight requirements.
For outdoor construction, I choose suitable timber, exterior-rated fasteners, and a finish designed for outdoor conditions. I also secure the structure properly, particularly if it will support hanging plants or stand in an exposed area.
4. Make a Long Bench Plant Display
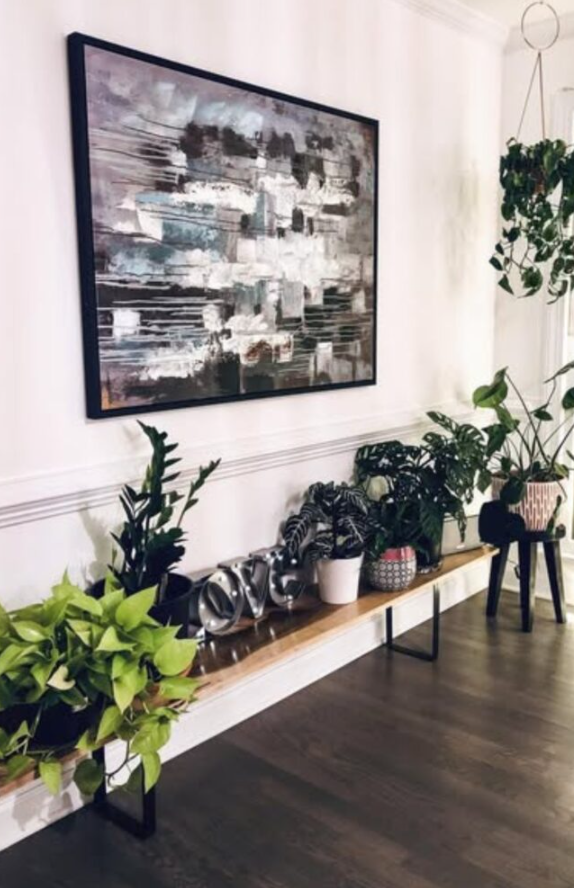
A long wooden bench is a practical choice when I want to display several plants in one place. It creates a continuous surface, helping a collection of separate pots look like a planned arrangement rather than scattered decorations.
I can build a basic bench from a sturdy timber top and strong legs. Before assembling it, I measure the available wall or window area so the finished piece does not obstruct movement around the room.
For the display, I mix plants of different heights and leaf shapes. Larger pots can anchor the ends, while smaller containers fill the gaps. I avoid packing the bench too tightly because plants need room for growth and maintenance.
The space underneath can hold baskets, gardening tools, or additional floor plants, provided they do not make the area feel crowded.
5. Try a Slim Metal Plant Stand
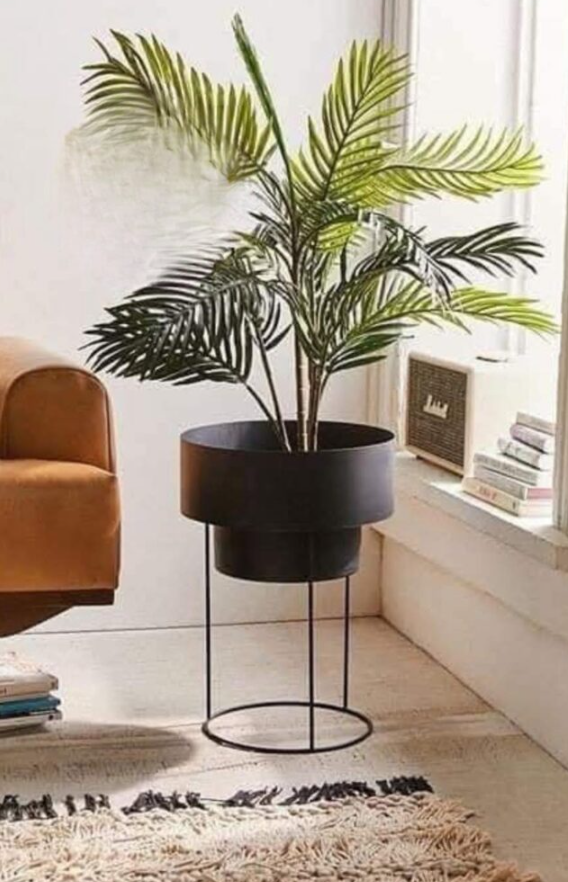
A slim metal plant stand is ideal when I want to highlight one plant without taking up much room. Its open frame creates a lighter appearance than a large wooden cabinet or bulky shelving unit.
I can place this type of stand beside an armchair, near a window, or in a narrow corner that needs a little greenery. A simple circular platform with metal legs can suit contemporary interiors, while a dark finish creates contrast against lighter walls.
For a DIY version, the design can be relatively minimal, but the joints and base still need to be strong. A narrow stand that wobbles or tips easily is not worth the space it saves.
If metalworking is not an option, I can use the design as inspiration for adapting an existing frame or selecting a suitable ready-made stand.
6. Add a Plant Stand Behind the Sofa

The narrow area behind a sofa can be useful for a plant display, especially when I do not have enough room for another side table. A slim console-style stand makes use of that space while adding greenery at a comfortable viewing height.
I start by measuring the gap behind the sofa. The stand should fit without pushing the furniture forward or making it difficult to reach nearby windows, curtains, or electrical outlets.
A simple timber top with sturdy legs is often enough. I can arrange taller plants toward the ends and smaller pots between them, keeping the overall display balanced without blocking too much natural light.
This setup is particularly effective when the sofa sits near a bright window. However, I still check the light requirements of each plant instead of assuming every variety will thrive in the same position.
7. Make a Playful Log Plant Stand

For a more natural look, I can use small logs, sturdy branches, and flat wood slices to create a plant stand with plenty of character. The different shapes and textures make this design feel less formal than a standard wooden frame.
A simple version can use a thick piece of wood as the main support, with smaller platforms attached at different heights. I would reserve this design for lightweight pots, such as small succulents or compact herbs, unless the structure is specifically built to support heavier containers.
I also check that the wood is stable, dry, and free from loose or decaying sections. Each platform should sit securely and remain level enough to hold its pot.
To add more personality, I can pair the natural wood with small painted containers made from suitable recycled materials. A few contrasting colors can make the display playful without requiring expensive supplies.
8. Create a Wicker Planter Stand

If I want a plant display with a softer texture, I can combine a woven basket with a wooden stand. The wicker adds warmth, while the raised base gives the planter a more finished appearance.
This style works well in living rooms, bedrooms, and spaces with natural wood, linen, or neutral colors. I can choose a basket that complements the furniture and use a separate nursery pot inside it.
One practical detail matters here: woven baskets are not always waterproof or strong enough to carry a heavy, wet planter on their own. I use a suitable inner container and make sure excess watering does not collect inside the basket or damage the floor.
Tapered wooden legs can lift the basket slightly and create a simple furniture-style finish. I also check that the base sits evenly so the planter does not wobble when the plant grows.
9. Build a Modern Tiered Plant Stand
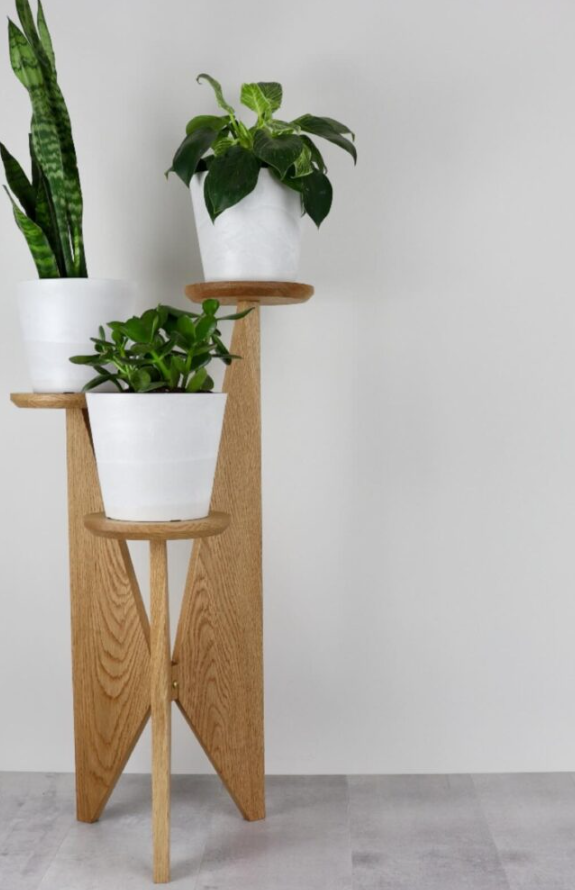
A tiered plant stand gives me multiple display levels without requiring a wide piece of furniture. This makes it useful for apartments, compact rooms, and corners where horizontal space is limited.
For a modern design, I can attach round or softly shaped shelves at different heights along a central wooden support. The staggered arrangement creates a more interesting display and gives individual plants room to stand out.
Before fixing the shelves in place, I arrange the empty pots to check their spacing. This helps me avoid placing a large container where it blocks a smaller plant or leaves too little room for foliage.
I also consider watering access. Every pot should be easy enough to reach so I can check the soil, remove dead leaves, and rotate plants when needed.
10. Stack Hexagon Plant Shelves

Geometric shelving can turn a simple plant display into part of the room’s decor. Hexagon-shaped wooden frames provide separate spaces for small pots while adding an interesting pattern to the wall.
I can arrange several frames together or stack them in a staggered layout. Leaving some openings empty is a useful design choice because it prevents the display from looking overcrowded.
For this project, I choose lightweight planters and make sure the frames have enough depth to hold them securely. If I mount the shelves on a wall, I use appropriate anchors and fasteners for the wall material and the expected load.
I also leave enough room for leaves to grow without pressing against nearby pots or walls. The combination of geometric lines and natural foliage works particularly well in small living spaces.
11. Make a Spiral Staircase Plant Stand
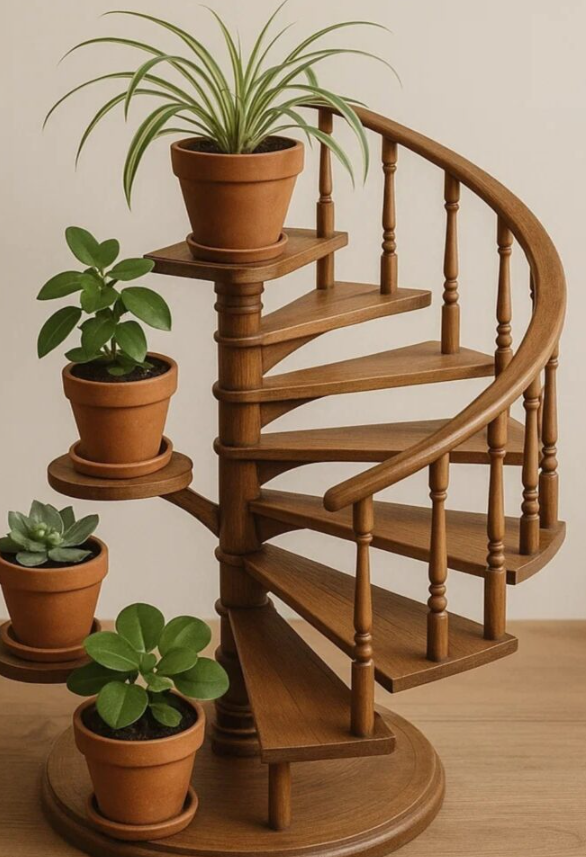
A spiral staircase plant stand is a good option if I want something more unusual than a standard shelf. Its individual platforms rise around a central structure, giving each small pot its own place.
This design takes more planning and construction than a basic wooden stand, so I would measure the pots and platform sizes before cutting any material. That helps me keep the steps evenly spaced and prevents containers from interfering with one another.
Smaller plants are usually a better fit because oversized pots can hide the staircase shape and make the structure harder to balance. I would also check that the central support and base can handle the combined weight.
Placed near a bright window, the staggered platforms can create a layered arrangement of leaves and flowers. It is a project worth considering if I enjoy detailed woodworking and want the stand itself to become a decorative feature.
12. Use Lightweight Metal Plant Stands
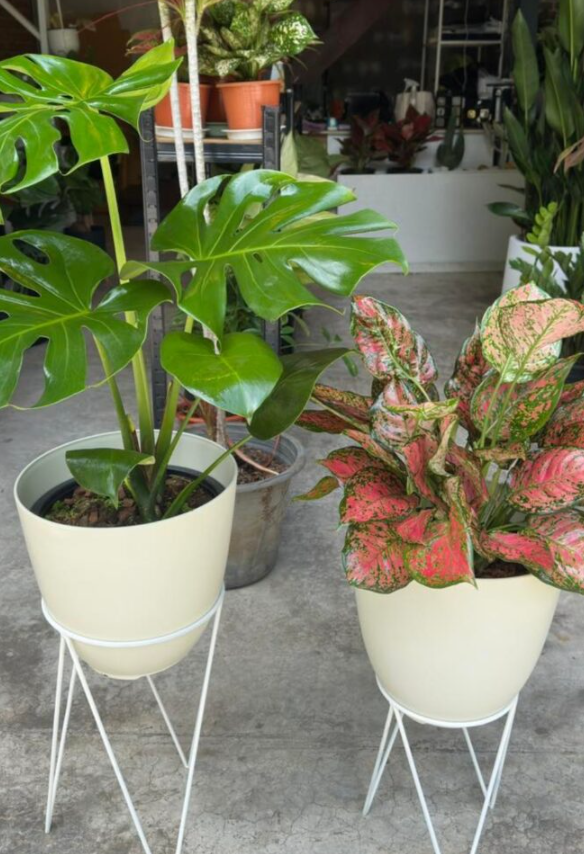
Lightweight metal stands help me add height to a plant display without making the surrounding area feel visually crowded. Their open frames work well in entryways, smaller rooms, balconies, and patios.
A tripod-style design is one option. It raises the pot above the floor while leaving much of the area underneath visible, which can help a compact space feel more open.
However, I do not sacrifice stability just to make the frame look thinner. The legs need a suitable spread, the pot must sit securely, and the finished stand should remain steady when the plant is watered or moved.
For outdoor use, I choose metal with a suitable rust-resistant finish. I also inspect the joints and protective coating periodically, especially if the stand is exposed to rain.
13. Repurpose a Small Wooden Table
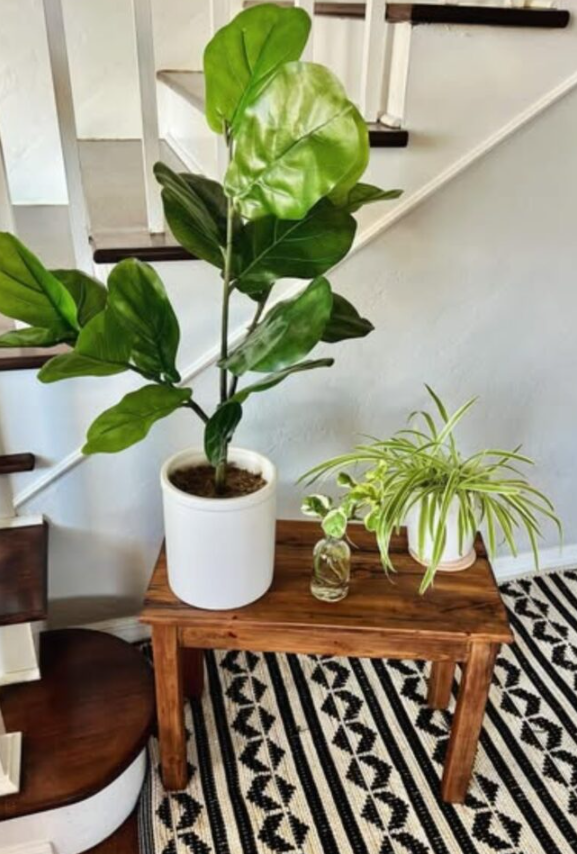
One of the easiest ways to make a plant stand is to reuse a small table I already own. A side table, thrifted find, or unused piece of furniture can become a plant display with very little construction.
I begin by checking the table for loose joints, damaged legs, and a top that may be weakened by moisture. If it is in good condition, a light sanding and a fresh coat of paint or stain may be all it needs.
When arranging the plants, I combine different heights and shapes rather than filling the top with identical pots. A taller plant can anchor one side, while a smaller or trailing variety balances the other.
I also protect the table from water marks by using suitable saucers or waterproof inserts. This small step helps preserve the finish and makes the stand easier to maintain.
14. Build a Garden Potting Table

A garden potting table is useful when I want a dedicated space for plant care as well as a place to display finished pots. It combines a work surface with storage, making regular gardening tasks easier to manage.
A practical design can include a wide tabletop, a lower shelf for pots and soil, and a back panel for hanging lightweight tools. I can adjust the dimensions to suit the space available in my garden or on my patio.
Before building, I think about the tasks I do most often. If I regularly repot plants, I need enough working room for containers, potting mix, and hand tools. A lower shelf can keep supplies close without covering the main surface.
When the table is not being used for gardening, I can display a few finished plants on top. For outdoor durability, I select appropriate materials and finishes and position the table where it will remain stable and accessible.
15. Add a Tall Porch Plant Stand
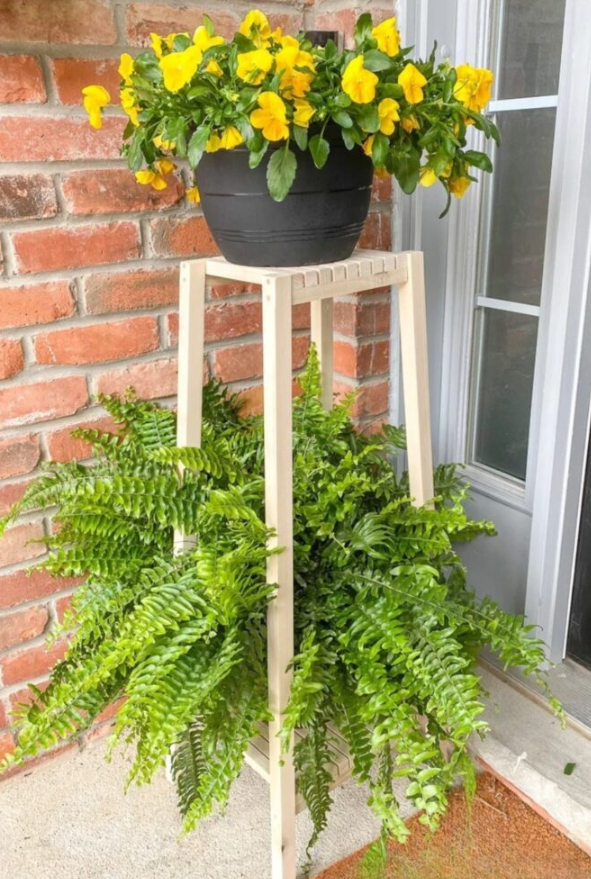
A tall plant stand can make a porch display more interesting by bringing some greenery closer to eye level. It also creates another display level without requiring a large footprint.
For a simple DIY version, I can build four legs with a sturdy platform near the top. The platform should be wide enough for the pot and strong enough to support its weight after watering.
I like combining the raised planter with a larger pot placed directly on the floor below. This creates a layered look while keeping the arrangement relatively compact.
Outdoor placement needs a little extra thought. I check that the stand sits on level ground, that its legs and joints can handle the weather, and that the planter cannot be easily knocked over. If the porch is exposed to strong winds, a broader or secured design may be more suitable.
16. Turn Bottles Into Colorful Planters

If I want an inexpensive project that uses materials I already have, recycled plastic bottles can become small planters. This idea is especially useful for creating a colorful display on a balcony, patio, or garden shelf.
I can cut suitable bottles into planter shapes, decorate the outside with paint, and group the finished containers on an existing shelf or purpose-built frame. Small plants and lightweight growing media are generally easier to manage in these containers than large specimens.
Drainage needs attention from the start. I provide suitable drainage openings for the plant and protect the surface underneath from excess water. I also smooth or cover sharp cut edges before handling the finished planters.
For a coordinated display, I can repeat two or three colors rather than using a different shade on every bottle. The result is cheerful, affordable, and a useful way to reuse suitable household materials.
17. Build a Simple Tiered Outdoor Stand
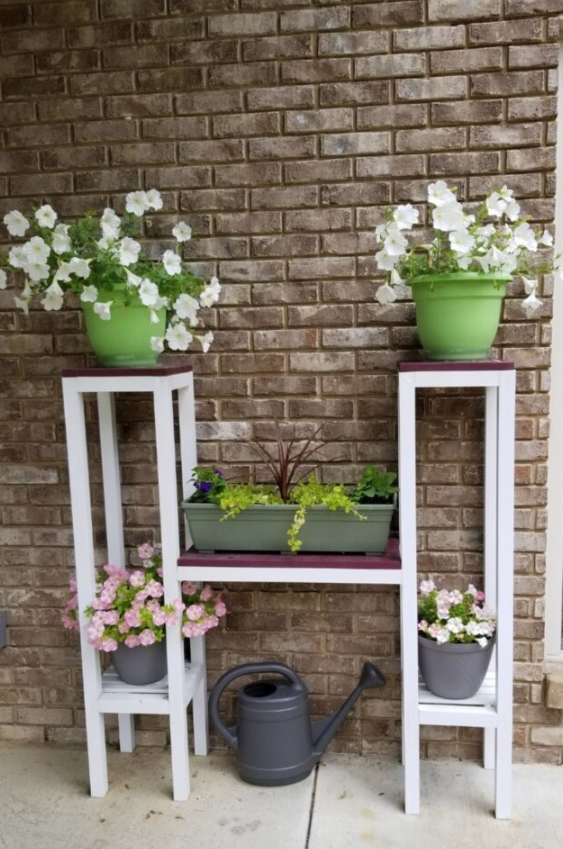
A tiered outdoor plant stand offers more room than a single-pot holder without taking up as much space as a large garden station. I find this style useful for porches, patios, and outdoor walls where several pots need to fit together.
A basic wooden version can have two or more levels supported by a strong frame. I place heavier pots on the lower shelves and reserve the upper levels for smaller containers, herbs, or trailing flowers.
Before fixing the shelves, I check the space between them. Plants need enough room for their foliage, and I want to be able to remove each pot without disturbing the others.
I can leave the timber in a natural finish or paint it to match the exterior of the house. For longer outdoor use, I select suitable exterior finishes and hardware and make sure water can drain away instead of collecting on the shelves.
18. Make a Hanging Shelf Plant Display

Hanging shelves are a useful alternative when I want to display plants without filling the floor with furniture. A pair of wooden boards suspended by rope can provide separate levels for small pots and trailing greenery.
I first decide how many shelves I need and how much vertical space each plant requires. Leaving enough room between the boards helps prevent the foliage from becoming cramped as the plants grow.
The mounting system is the most important part of the project. I use hardware suited to the ceiling or supporting structure and account for the combined weight of the boards, pots, soil, plants, and retained water.
I also consider watering before choosing the final position. Shelves should be accessible enough for routine care, and water must not drip onto furniture, electrical equipment, or delicate flooring.
19. Build a Simple Hanging Plant Frame

A freestanding hanging plant frame is worth considering when I want to display baskets but do not have a suitable ceiling, tree, or overhead beam. A simple wooden frame can provide its own support for several hanging pots.
A tall U-shaped design is one possible starting point. I can adjust its width and height to fit the patio or garden, leaving enough space for the baskets to hang freely without striking the frame.
The frame must be designed around the actual load rather than the empty baskets. Wet soil and retained water add weight, so the posts, crossbar, joints, and hooks all need to be appropriate for the intended use.
For an outdoor display, I also consider wind exposure and ground stability. Once the structure is secure, I can arrange flowers or trailing plants at different heights to create a clear focal point in an otherwise plain area.
20. Make a Vertical Crate Plant Wall
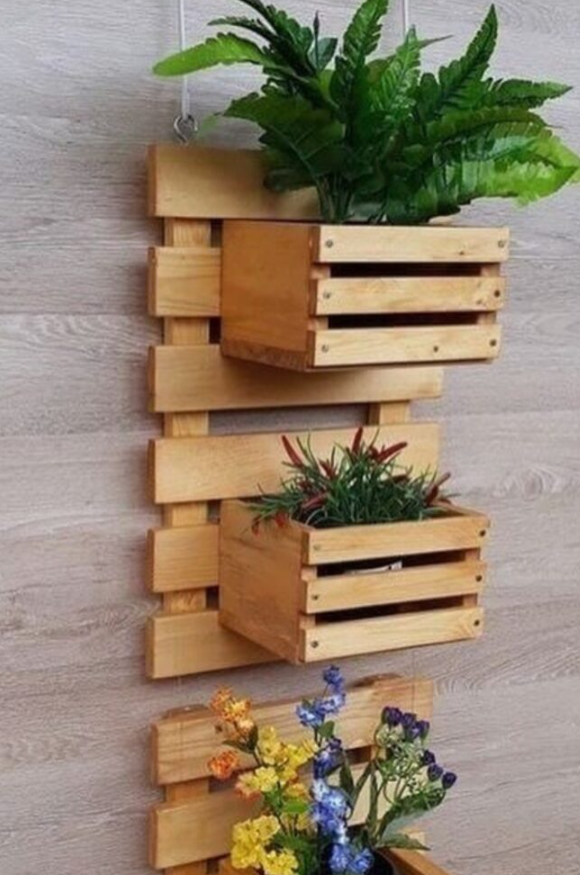
A vertical crate plant wall helps me make use of an empty wall when there is little room for floor-standing planters. By arranging small boxes or crates at different heights, I can create several separate spaces for greenery.
I can build the frame from suitable timber and attach individual crate-style compartments to it. Before adding the pots, I make sure the structure is securely fixed and that each compartment can carry its intended load.
For safety, I place heavier planters toward the bottom and use lighter containers higher up. This reduces unnecessary strain on the upper sections and makes the overall display easier to manage.
Watering is another detail I plan for in advance. Each container needs a suitable way to handle excess water, and I avoid designs that allow runoff to damage walls or collect around lower plants.
21. Turn a Pallet Into a Colorful Plant Stand
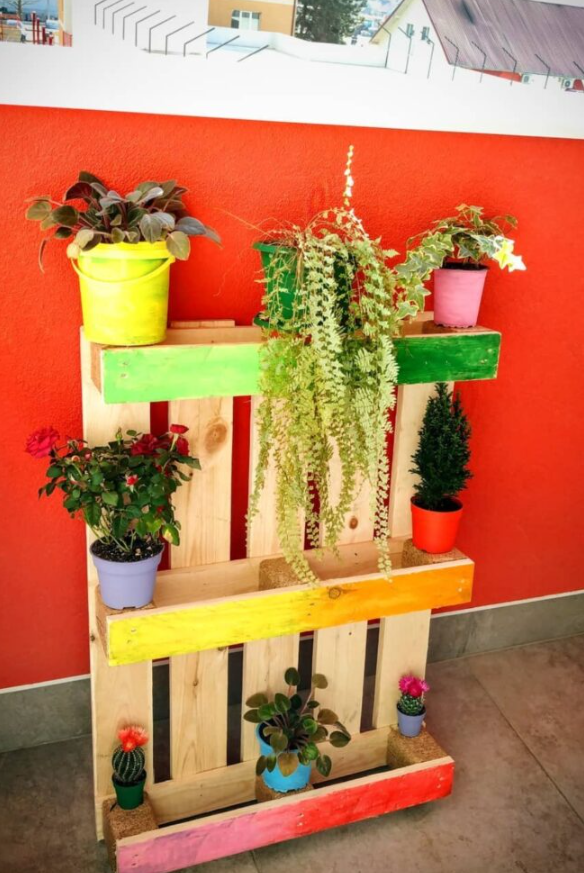
A wooden pallet can provide the starting point for a vertical plant stand without requiring an entirely new frame. With the right preparation, I can use its slats to support small pots or attach planter boxes for an outdoor display.
I begin by inspecting the pallet for loose boards, damaged timber, contamination, and unsuitable treatments. I choose a pallet that is appropriate for reuse, sand rough areas carefully, and repair any weak sections before adding plants.
Next, I decide whether to keep the wood natural or paint it in one or more colors. I secure the pots or planter supports so they cannot slip out when the stand is moved or exposed to wind.
If the stand will remain outside, I use an appropriate outdoor wood finish and position it securely. A trailing plant near the top can soften the straight lines of the pallet and help the finished display look more natural.
How to Choose the Right DIY Plant Stand
When I choose a DIY plant stand, I start with the problem I want to solve rather than the design that looks most impressive. The right option depends on my available space, the size of my collection, the weight of my pots, and where the stand will be placed.
If floor space is limited, I consider a hanging plant corner, rope shelves, a vertical crate wall, or a compact tiered stand. These designs use vertical space, although I still need to check light levels and make sure the mounting system is secure.
For one large plant, a simple wooden stand, wicker planter stand, or slim metal frame may be enough. If I have several pots to organize, a long bench or tiered display gives me more room. A garden station or potting table is more useful when I also need a dedicated place for gardening supplies.
For a porch or balcony, I look at weather resistance, drainage, and wind exposure before choosing materials. Repurposed tables and suitable reclaimed timber can help keep costs down, but only when the materials are in good condition and strong enough for the job.
My final tip is to leave some breathing room between plants. A display does not need to fill every shelf to look complete, and leaving space makes watering, pruning, and moving pots much easier.
The best DIY plant stand is one that fits your home, supports your plants safely, and makes caring for them more convenient. Start with a simple design if you are new to DIY, then build a more detailed display as your collection grows.
Final Thoughts
The best DIY plant stand is one that fits your space, supports your plants safely, and makes everyday plant care easier. Whether I choose a simple wooden stand, repurpose an old table, build tiered shelves, or create a vertical garden from a suitable pallet, I can find a design that suits my home and budget.
Before starting, I make sure the materials are appropriate, the structure is stable, and each plant has enough light and room to grow. I also leave enough space for watering and maintenance so the display stays practical as the plants mature.
With a little planning and creativity, a DIY plant stand can turn an unused corner, balcony, porch, or patio into an attractive plant display without requiring a large budget.