15 Patchwork Sweatshirt DIY Ideas for 2026
A patchwork sweatshirt is a fun way to turn a plain sweatshirt and leftover fabric scraps into something unique. Whether you like colorful hearts, quilted stars, bold lettering, or large appliqué designs, there are plenty of ways to create a style that suits your taste. In this guide, I’ll share creative patchwork sweatshirt ideas, simple sewing techniques, and practical tips for choosing fabric, using stabilizers, finishing edges, and caring for your finished project. You’ll also learn how to avoid common sewing problems, making it easier to get started even if you’re new to clothing upcycling.
Before You Start a Patchwork Sweatshirt
Before I start a patchwork sweatshirt project, I prepare the garment and fabric scraps to avoid problems later. I wash and dry the sweatshirt first, especially when I plan to combine it with cotton fabric that may shrink differently.
For beginners, I recommend making the patchwork design separately and attaching it to the sweatshirt once it is ready. This gives me better control over small pieces and makes sewing easier because I do not have to manage the entire stretchy garment while joining the scraps.
If you want to try more projects using clothes you already own, check out our Easy DIY Clothes Ideas article for simple ways to refresh your wardrobe.
What Stabilizer Should You Use on a Sweatshirt?
When I embroider a sweatshirt or add an appliqué with plenty of decorative stitching, I usually recommend cut-away stabilizer. Sweatshirt fabric can stretch during sewing, and the stabilizer helps reduce unwanted movement and keeps the finished design looking smoother.
For a typical medium-weight sweatshirt, one suitable layer may be enough. However, a large appliqué, dense embroidery, or particularly stretchy fabric may need additional support. I avoid adding too many layers because excessive stabilizer can make the finished area stiff and uncomfortable.
A cut-away stabilizer remains behind the stitches after sewing. This continued support is useful because the sweatshirt will stretch when I put it on, take it off, and wash it.
Cut-Away vs Tear-Away Stabilizer
I choose between cut-away and tear-away stabilizer based on how much support the fabric needs. Tear-away stabilizer can work well with stable materials, but sweatshirt fabric is usually more flexible and may lose support once the backing is removed.
If the sweatshirt stretches noticeably when I gently pull it from side to side, I prefer cut-away stabilizer for embroidery and dense stitching. I follow the stabilizer manufacturer’s instructions and carefully trim away the excess without cutting through the garment or stitches.
Should You Use Fusible Web Too?
Fusible web serves a different purpose from stabilizer. I use stabilizer to support the sweatshirt while sewing, whereas fusible web temporarily bonds the appliqué fabric to the garment and helps keep the design in place.
For shapes such as hearts, stars, letters, and flowers, fusible web makes positioning much easier. I can arrange the pieces, check the design, and secure them before stitching around the edges.
I always check the fusible web instructions before applying heat because some sweatshirt fabrics contain synthetic fibers or printed finishes that may be damaged by excessive temperature. Testing on a hidden area or fabric scrap helps me avoid unwanted marks.
Appliqué Back Motif

A large appliqué across the back can turn a plain sweatshirt into a statement piece. I like this approach because it gives me enough space to combine different fabric prints without covering the entire garment.
I start by drawing a simple design on paper. Flowers, bows, fruit, animals, and bold graphic shapes are useful choices because I can divide them into sections without making the overall design difficult to recognize.
After arranging the fabric scraps, I join them into a panel or layered design. I then use fusible web, when suitable, to secure the appliqué before sewing around its edges. A straight stitch creates a relaxed finish, while a narrow zigzag can provide more coverage over raw edges.
For a large back motif, I place suitable stabilizer behind the sweatshirt while stitching. I also support the garment with both hands without pulling it through the machine, which helps reduce stretching and puckering.
Patchwork Character Panel
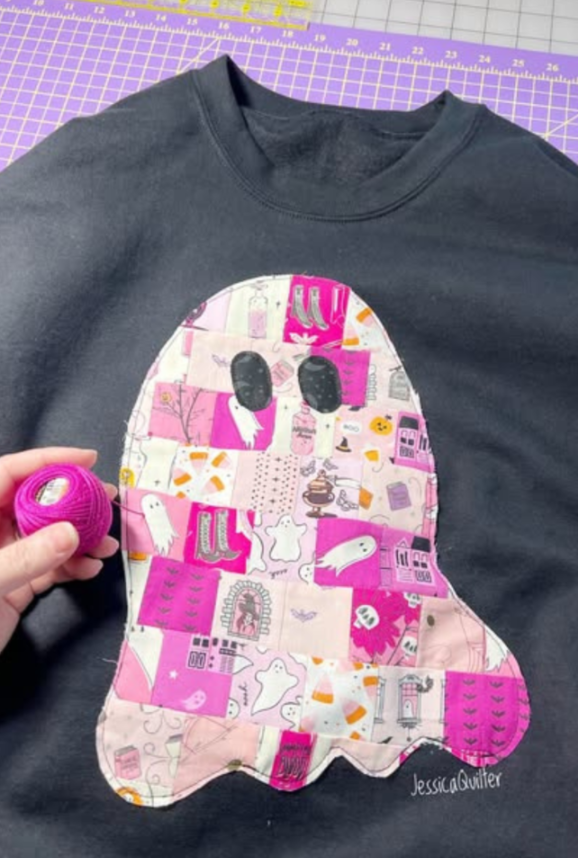
A patchwork character panel lets me create a colorful design without sewing individual scraps directly onto the sweatshirt. I first join several fabric pieces into one larger panel, making sure the seams are pressed flat.
Next, I place a paper template over the finished panel and trace the character’s outline. Cutting the complete shape at once helps me keep the edges consistent, even when the fabrics inside the design have different colors and prints.
I secure the finished shape to the sweatshirt using a suitable fusible web or another temporary method before stitching around it. Once the main appliqué is attached, I add small details such as eyes, outlines, or decorative stitching.
This technique also works for flowers, animals, initials, numbers, and other simple shapes. For my first attempt, I would choose a design with a clear outline and avoid tiny details that require complicated stitching.
Quilted Heart Patch
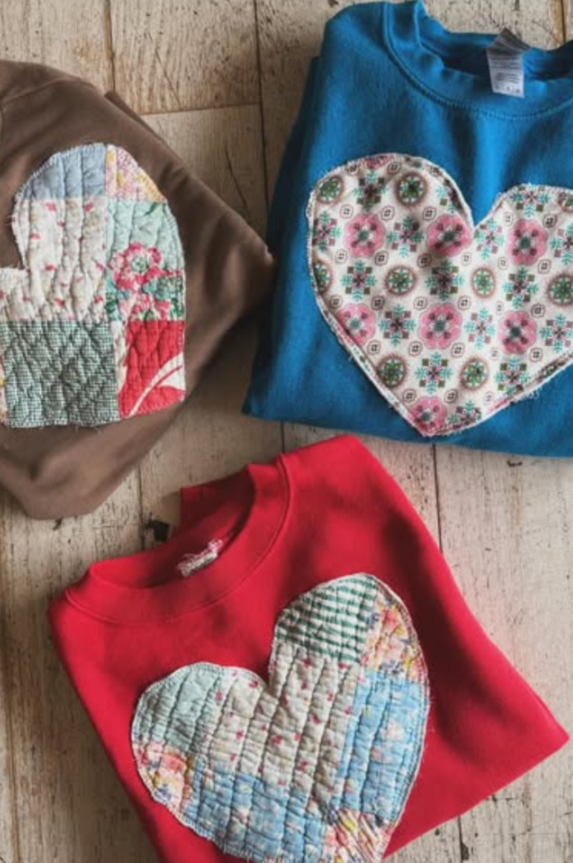
A quilted heart is a practical way to use small fabric scraps left over from other sewing projects. I begin by joining the scraps into a square or rectangle instead of trying to fit every piece into a heart shape immediately.
Once the patchwork is complete, I add a thin layer of batting behind it and stitch through the layers to create a small quilted piece. I keep the batting lightweight because thick layers can make a sweatshirt patch bulky, especially on the chest.
After quilting, I trace a heart template and cut out the shape. I then attach the finished heart to the sweatshirt with stitching around the edge.
Making the heart after completing the patchwork and quilting gives me more control over the final shape. It also helps prevent small fabric pieces from shifting while I work around curved edges.
Colorblock Statement Hoodie
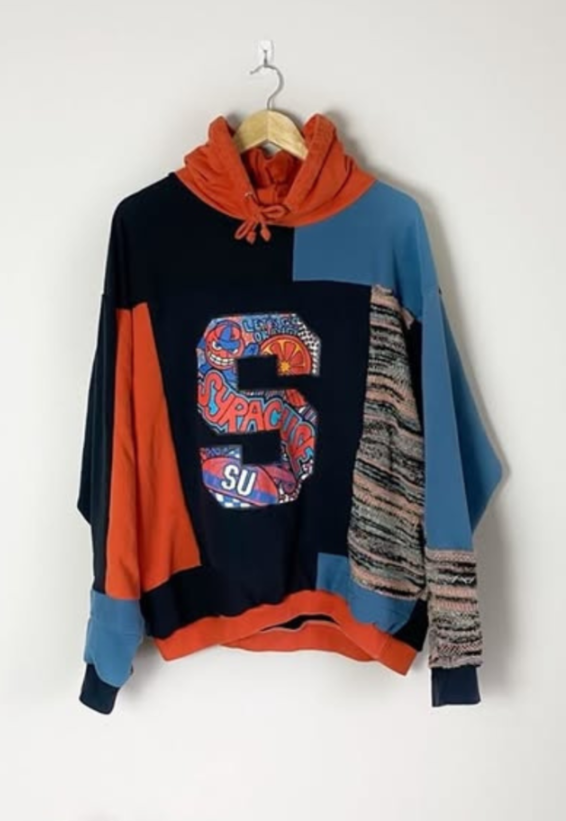
A colorblock hoodie is a good option when I want patchwork to become part of the overall garment design. Instead of adding one small motif, I use contrasting fabrics to create larger sections across the sleeves, pockets, hood, or front.
When working with an existing hoodie, I consider whether adding a panel on top will achieve the look I want before taking the garment apart. Sewing a panel onto the existing fabric is often simpler than reconstructing the hoodie, although the best method depends on the design and how much bulk the extra layer creates.
I also plan the colors before cutting anything. Three or four coordinated fabrics can create a clear, balanced design without making the hoodie look too busy.
For a more comfortable result, I pay attention to fabric weight and stretch. Similar materials are generally easier to combine, particularly around areas such as the cuffs and hood that need to move naturally.
Raw-Edge Heart
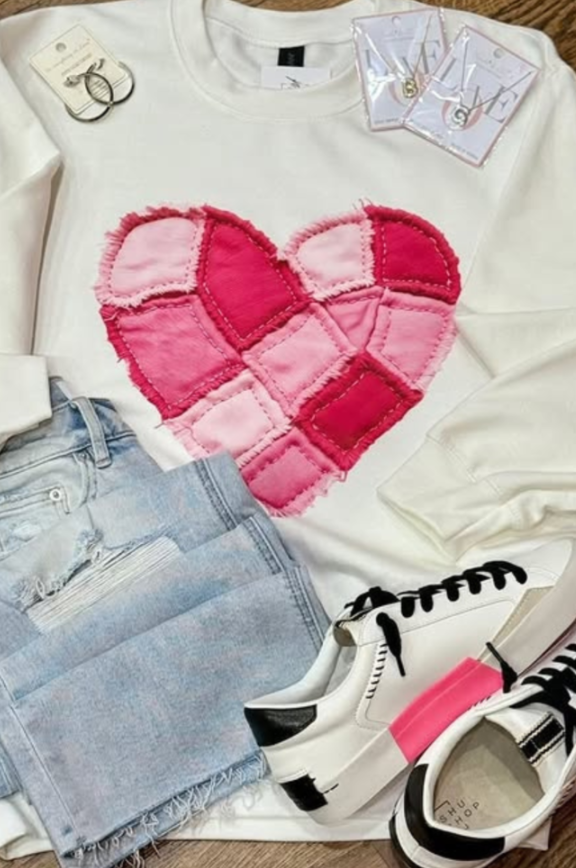
For a relaxed, worn-in appearance, I can leave the edges of a patchwork heart unfinished. This style allows the fabric to soften and fray slightly over time, creating a casual handmade look.
I first join several scraps into a single panel, press the seams, and cut out a heart. I then position the shape on the sweatshirt and sew around it, keeping the stitching slightly inside the raw edge.
Cotton fabrics are a useful choice because they are easy to cut and generally develop a soft frayed edge. However, the amount of fraying depends on the weave, fabric quality, and washing conditions.
If I notice that the edges are fraying too quickly, I add another line of stitching inside the first one. I also avoid placing the design where frequent rubbing could cause the edges to wear prematurely.
Wreath Patch Layout

A wreath-shaped patchwork design creates a focal point without covering too much of the sweatshirt. I would place it on the front or back, leaving enough open space around the circle so the individual fabric pieces remain visible.
To make the design, I cut repeated shapes such as leaves, petals, wedges, or small geometric pieces. I arrange them in a circle first, checking the spacing and colors before attaching anything permanently.
Once the layout looks balanced, I secure the pieces with a suitable temporary adhesive, fusible web, or careful pinning. I then stitch around the sections, working slowly to maintain the circular outline.
I find that fabrics with similar thicknesses are easier to arrange in a flat wreath. If some scraps are much heavier than others, the finished circle may become uneven or develop bulky spots.
Geometric Quilt Star
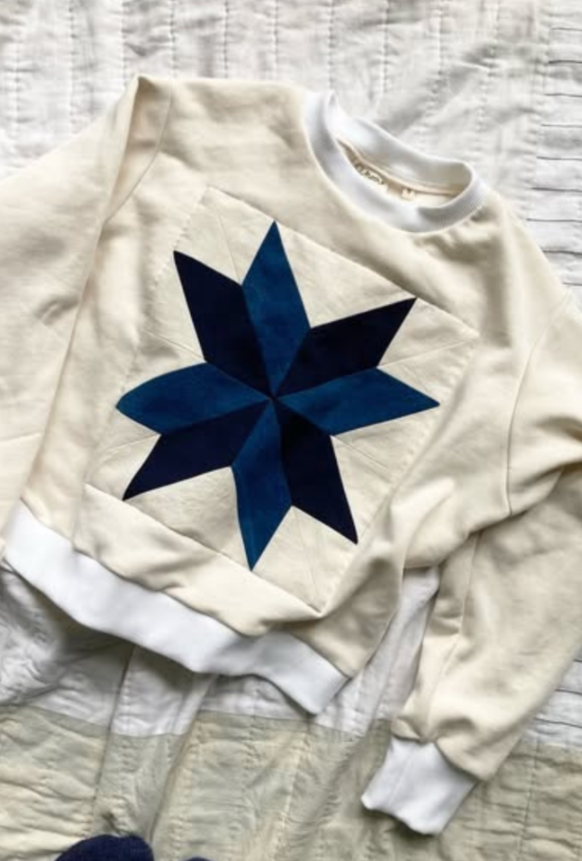
A geometric quilt star adds a neat, structured detail to a simple crewneck sweatshirt. The key is to create the star as a separate quilt block so I can focus on the angles before attaching it to the garment.
I begin with a simple star pattern and cut the fabric pieces according to the template. I join the sections carefully and press the seams as I go, which helps the points line up and keeps the block from becoming unnecessarily bulky.
When the star is complete, I trim the surrounding fabric into a square or another suitable outline. I then position the finished block on the sweatshirt and stitch around its edges.
If I am new to quilting, I choose a pattern with larger sections rather than one made from many tiny triangles. Larger pieces are easier to handle and give me more room to correct small alignment mistakes.
Patchwork Name Letters
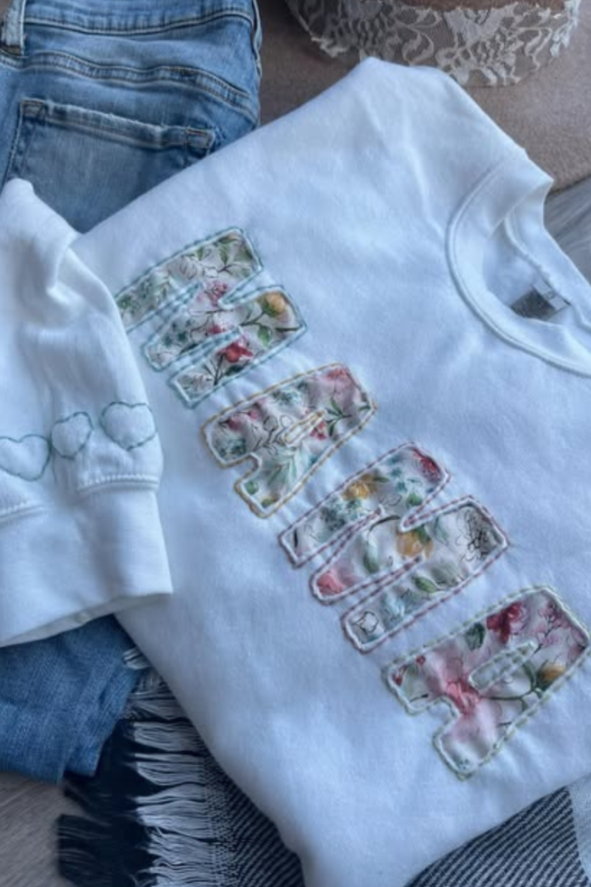
Patchwork letters offer an easy way to personalize a sweatshirt with a name, initials, or a short word. I start by joining fabric scraps into a panel large enough for the letters I want to make.
Next, I trace the letters onto the back of the panel and cut them out carefully. I prefer bold block lettering because narrow strokes and delicate script can be difficult to cut, position, and stitch neatly.
Before attaching the letters, I arrange the complete word on the sweatshirt and step back to check the spacing. This simple step helps me spot uneven gaps or a design that sits too high or too low.
Once I am happy with the placement, I secure each letter with fusible web if the fabric allows it, then sew around the edges. Fabric scissors with sharp blades also help produce cleaner corners and curves.
Layered Star Patches
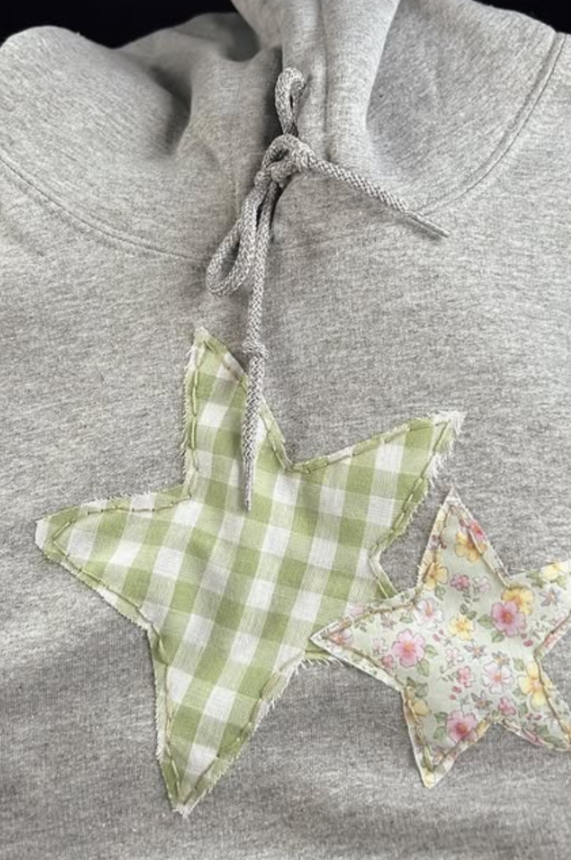
Small star appliqués are useful when I want a patchwork design that feels subtle rather than oversized. I can arrange several stars across the upper chest, shoulder, sleeve, or neckline without covering the entire sweatshirt.
I cut stars in different sizes from coordinating fabric scraps. For extra dimension, I can place a smaller star over a larger one, provided the added layers do not make the fabric too stiff.
Before sewing, I lay out all the stars and look at the arrangement as a whole. I leave some open space between the shapes because crowding them together can make the design harder to read.
Once the layout is set, I secure each star and stitch around its edges. For small points and tight corners, I slow down and turn the fabric carefully to avoid uneven stitching.
Phrase Patch Letters
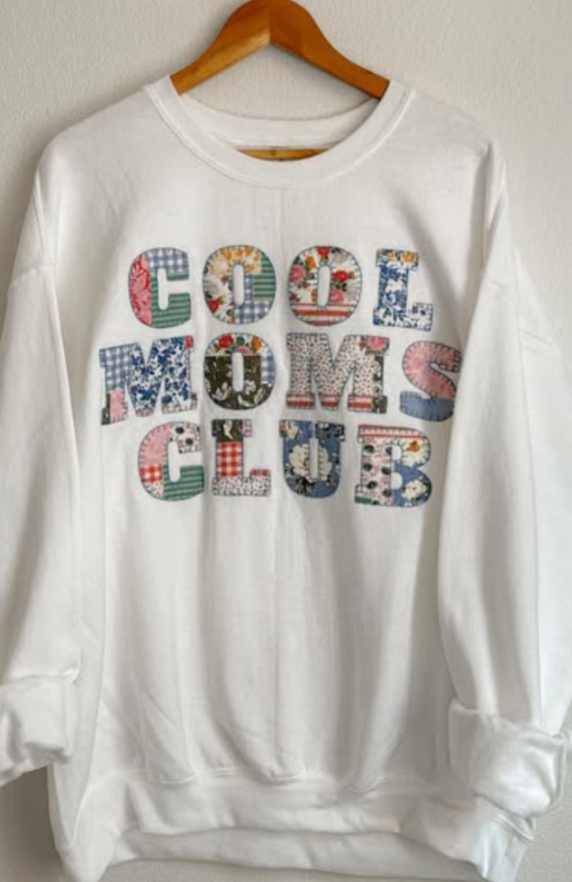
Phrase patch letters follow the same basic method as name lettering, but the finished design communicates a short message. I find that a brief phrase is easier to arrange because the letters can remain large enough to cut and sew comfortably.
I choose the wording first, then decide whether to use one fabric throughout or combine several prints. Repeating a few fabrics across the letters helps connect the colors and gives the finished design a more coordinated appearance.
Before attaching the letters, I mark a temporary baseline with removable tape or another suitable guide. I also check the gaps between words and letters from a distance to make sure the phrase looks balanced.
Fusible web can help keep each letter in place while I stitch around it. I choose a straight stitch for a casual finish or a narrow zigzag when I want more coverage along the raw edges.
Scrappy Heart Block
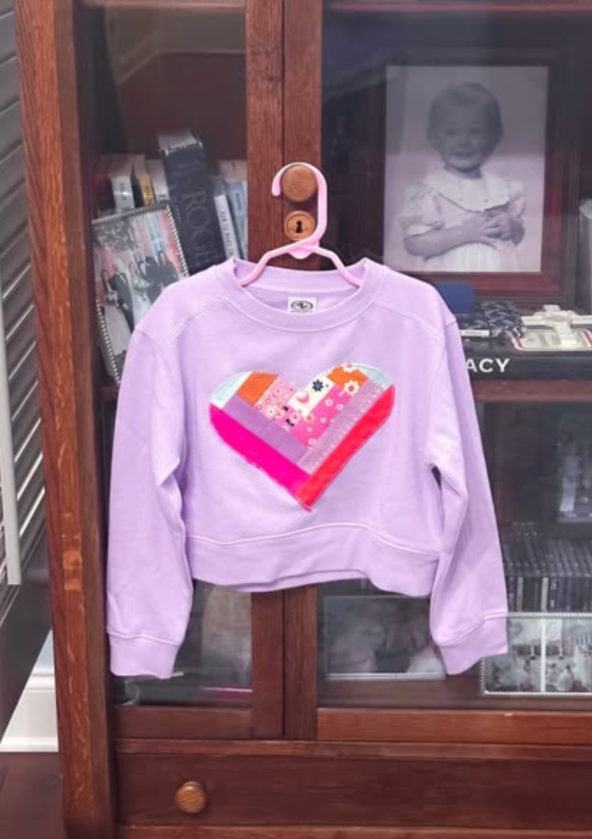
A scrappy heart block is a useful project for narrow fabric strips that are too small for larger designs. I sew the strips together to form a small rectangular panel, then press the seams so the finished block lies as flat as possible.
After the panel is ready, I trace a heart template and cut out the shape. This method lets me control the heart’s proportions without struggling to join tiny scraps along a curved outline.
The finished heart can sit on the chest, sleeve, or front pocket area of a sweatshirt. I can leave the edges raw for a casual appearance or use a more finished edge treatment for a neater result.
I avoid making the heart too small if the patchwork contains many seams. Several seam allowances meeting at one point can create a thick area that is harder to sew through and less comfortable to wear.
Mixed Logo Patch

If my sweatshirt already has a graphic or logo, I can build a patchwork design around it rather than covering it. This approach lets the original image remain part of the finished design while giving the garment a fresh appearance.
I might add small patches around the graphic, create a fabric frame, or place the logo within a larger patchwork panel. Before sewing, I check that the new pieces do not obscure important parts of the original image.
When the existing logo is detailed, I prefer calmer fabrics that allow it to remain visible. A simple graphic, on the other hand, can work well with brighter prints and stronger color contrasts.
Patchwork can also help cover a damaged or stained area near a graphic, provided the repair is suitable for the fabric. Before sewing through a printed section, I test the needle and stitch on an inconspicuous area because some printed finishes behave differently from plain sweatshirt fabric.
Mixed Fabric Letters
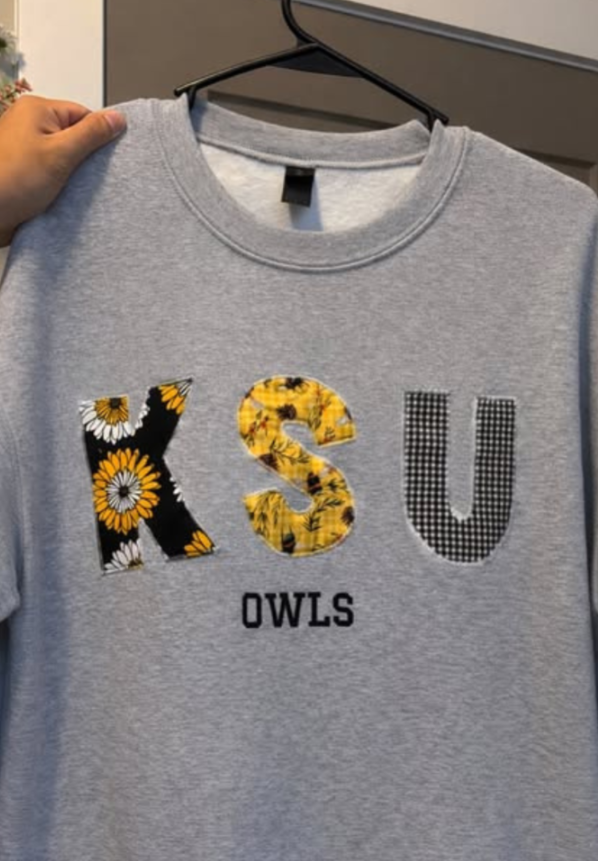
Mixed fabric letters are a simpler alternative to making every letter from a patchwork panel. Instead of joining several scraps first, I cut each letter from a different fabric and combine the shapes to create a colorful word.
I choose fabrics that stand out against the sweatshirt so the lettering remains easy to read. If one print looks too strong beside the others, I can move it to another letter or repeat the same fabric elsewhere to balance the design.
I lay out the entire word before sewing anything down. This lets me check the overall width, spacing, and alignment without having to remove stitches later.
Fusible web is helpful because individual letters can shift during sewing. I secure the pieces first, then use a straight stitch for a relaxed edge or a narrow zigzag for additional coverage.
Center Patch Panel

A square or rectangular center panel is one of the most straightforward patchwork designs I can make. It gives me room to experiment with fabric combinations while keeping the overall shape simple.
I build the panel separately using squares, strips, framed blocks, or irregular scraps. After joining the pieces, I press the seams and check that the panel lies flat before deciding on its final size.
Next, I place it on the sweatshirt and check the position in relation to the neckline, sleeves, and hem. Oversized and boxy sweatshirts often provide enough room for a larger panel, while a smaller garment may look better with a compact design.
If I have accumulated scraps from several projects, I sort them by color, fabric weight, and size before starting. Our Fabric Storage Ideas article can help me keep those leftovers organized for future sewing projects.
Patchwork Tree Shape

A patchwork tree is a simple way to create a seasonal sweatshirt design using the same basic appliqué method. I begin by joining fabric scraps into one panel, then cut the tree shape from the completed piece.
For a beginner-friendly version, I use a large triangle with a small trunk. If I want more detail, I can create several stacked sections to suggest branches while keeping the overall outline easy to recognize.
Once the tree is cut out, I secure it to the sweatshirt as one appliqué and stitch around the edge. This is generally easier to control than attaching every small square directly to the garment.
I can adapt the same method for pumpkins, flowers, houses, bows, mushrooms, or simple animal shapes. Changing the template and fabric colors is often enough to create a different look without learning a new sewing technique.
How to Keep Patchwork Flat on a Sweatshirt
The main challenge I watch for when sewing patchwork onto a sweatshirt is unwanted stretching. Because sweatshirt fabric is flexible, pulling it through the machine can cause ripples, uneven seams, and distorted appliqué shapes.
I use suitable stabilizer beneath areas that need extra support and secure the patch before sewing. I guide the garment gently rather than stretching it, allowing the sewing machine’s feed dogs to move the fabric at their normal pace.
If the design starts to look wavy, I stop and inspect the stitching before continuing. I check whether the fabric has stretched, the stabilizer has shifted, or the presser foot is struggling with several thick layers.
For larger appliqués, I find it helpful to test the stitch on a similar fabric scrap first. This gives me a chance to adjust the stitch length, thread tension, and stabilizer choice before working on the actual sweatshirt.
What Fabric Works Best for Sweatshirt Patchwork?
Quilting cotton is one of my first choices for sweatshirt patchwork because it is stable, easy to cut, and available in a wide range of colors and prints. Old cotton shirts can also provide useful fabric for letters, hearts, and other small appliqué shapes.
Lightweight denim can work when I want a sturdier patch, but I consider the extra thickness before adding it to the garment. Stretchy knit fabrics are another option, although they can be harder to control because both the patch and sweatshirt may move during sewing.
I try to combine fabrics with reasonably similar weights, especially when a design contains several small pieces. If one fabric is much thicker than the others, the seams may become bulky and the finished patch may not lie flat.
Before committing to a large project, I test a small sample with the fabrics, stabilizer, and stitch I plan to use. Our Easy Sewing DIY Ideas article is another useful starting point if I want to practise basic techniques first.
How Should You Finish the Edges?
The edge finish affects both the appearance and durability of a patchwork sweatshirt. I choose the stitch according to the fabric, the design, and whether I want a casual raw-edge effect or a more polished appliqué.
A straight stitch placed just inside the edge creates a simple finish and allows some fraying. A zigzag stitch covers more of the raw edge and can help limit fraying, while a satin stitch produces a fuller border but adds thread and stiffness.
For an intentionally unfinished look, I sew just inside the edge and allow the fabric to soften naturally with washing. I avoid placing the stitching so close to the edge that the fabric can easily pull free.
When I am unsure which finish will work best, I make a small test patch first. I wash the sample if necessary and inspect the edges before choosing the same method for a larger design.
How to Wash a Patchwork Sweatshirt
I turn a patchwork sweatshirt inside out before washing it to reduce rubbing against the appliqué and decorative stitching. I follow the garment’s care label and choose a wash temperature suitable for the sweatshirt and the added fabrics.
I avoid high dryer heat when the materials have different shrinkage characteristics or when the appliqué contains fusible products. Air-drying is a sensible option when I am uncertain how the finished design will respond to heat.
After washing, I check the patch edges and stitching for loose threads or lifting areas. If I find a small section that needs attention, I repair it promptly instead of allowing the damage to spread.
For the best results, I prepare the fabric properly before sewing and use compatible materials throughout the project. Good preparation makes routine care easier and helps the sweatshirt remain wearable for longer.
FAQs
Can I embroider a sweatshirt without stabilizer?
Yes, small embroidery designs can sometimes be stitched without stabilizer, but stretchy sweatshirt fabric is more likely to move or become distorted. The risk depends on the fabric, stitch density, and size of the design.
For dense embroidery or larger decorative designs, I generally prefer cut-away stabilizer because it provides support after the stitching is complete. I test the combination on a similar fabric before embroidering the finished garment.
Should I hoop the sweatshirt or float it?
Both methods can work, and I choose based on the sweatshirt’s thickness and stretch. When hooping, I make sure the garment sits smoothly without stretching the fabric beyond its natural shape.
For thicker sweatshirts, floating may be easier. I hoop the stabilizer, position the sweatshirt over it, and secure the garment with an appropriate temporary adhesive or basting stitches.
Whichever method I use, I check that the sweatshirt remains flat and stable before starting. Pulling the fabric too tightly during hooping can cause the finished embroidery to pucker when the garment returns to its natural shape.
Do I Need Fusible Web for Patchwork Appliqué?
No, fusible web is optional, but it makes many appliqué projects easier to manage. It helps hold the patch in place while I sew around the edges, especially when working with small letters, stars, or layered shapes.
If I prefer not to use fusible web, I can pin or baste the patch in place. I take care to secure the entire design so it does not shift while stitching.
I also check the fabric and product instructions before applying heat. Some sweatshirt materials require a lower temperature or a protective pressing cloth to avoid damage.
Can I Make a Patchwork Sweatshirt Without an Embroidery Machine?
Yes. I can make almost all of these patchwork designs using a regular sewing machine with a straight stitch or zigzag stitch. Neither an embroidery machine nor specialized embroidery software is necessary for basic appliqué.
For a small patch, hand sewing is another option. It takes longer, but it can work well for simple shapes and lightweight fabrics when I use secure, evenly spaced stitches.
An embroidery machine is helpful for detailed designs and programmed outlines, but it is not essential. I can start with a simple heart, star, letter, or square panel and build my skills from there.
Start With One Small Patch
If I am making a patchwork sweatshirt for the first time, I start with a small design instead of attempting a large back appliqué. A heart, star, initial, or simple chest patch gives me a chance to practise without managing too many pieces at once.
I use the first project to learn how the sweatshirt behaves under the presser foot, how much stabilizer I need, and which edge finish works best for my fabric. These small tests help me make better decisions when I move on to more detailed designs.
Once I feel comfortable with the process, I can experiment with larger patchwork panels, layered shapes, and colorblock designs. For another garment project, our DIY Patchwork Hoodie guide is a useful next step.
The most important thing is to plan the design, prepare the fabric, and secure the appliqué before stitching. With a little patience and a few basic sewing supplies, I can turn leftover fabric and a plain sweatshirt into something that feels personal and useful.
Conclusion
Making a patchwork sweatshirt is a simple way to reuse fabric scraps and give an old or plain garment a fresh look. I recommend starting with a small design, such as a heart, star, or initial, before trying larger appliqué panels or colorblock patterns. Choose fabrics that work well together, use suitable stabilizer when needed, and secure each patch before sewing to help keep the finished design neat. With a little planning and patience, you can create a personalized sweatshirt that reflects your style while making good use of fabric you already have.